Bạn có muốn ghi lại màn hình và âm thanh của mình không? Có nhiều lý do tại sao bạn cần ghi lại màn hình và âm thanh máy tính của mình. Bạn có thể ghi lại trò chơi của mình, tạo hướng dẫn, đánh giá nội dung hoặc sản phẩm, tạo nội dung, v.v. Với điều đó, bạn có thể hưởng lợi từ việc ghi lại màn hình và âm thanh của mình. Vậy, bạn có biết cách bắt đầu quy trình ghi màn hình và âm thanh không? Nếu chưa, hãy nắm bắt cơ hội để tìm hiểu mọi thứ trong bài đăng này. Chúng tôi ở đây để cung cấp cho bạn nhiều phương pháp khác nhau mà bạn có thể làm theo để hiệu quả ghi lại màn hình và âm thanh trên Windows.
Phần 1. Windows có thể ghi lại màn hình với âm thanh không
Chắc chắn là có. Nếu bạn có phần mềm tuyệt vời và đáng tin cậy, đặc biệt là chương trình ghi màn hình và âm thanh, thì việc ghi lại màn hình và âm thanh là khả thi. Với chương trình đó, bạn có thể ghi lại màn hình của mình một cách hoàn hảo với âm thanh. Chúng tôi hỗ trợ bạn nếu bạn muốn biết thêm về việc ghi lại màn hình của mình với âm thanh! Xem tất cả các chi tiết trong phần tiếp theo và tìm hiểu sâu hơn về cách ghi lại màn hình trên Windows với âm thanh.
Phần 2. 3 cách ghi màn hình trên Windows có âm thanh
1. Ghi lại màn hình có âm thanh bằng AVAide Screen Recorder
Một trong những phần mềm ngoại tuyến hiệu quả nhất mà bạn có thể sử dụng để ghi lại màn hình có âm thanh trên Windows là AVAide Screen Recorder. Trình ghi màn hình và âm thanh này có thể giúp bạn đạt được mục tiêu dễ dàng hơn. Thêm vào đó, phần mềm này cho phép bạn ghi lại màn hình máy tính theo hai cách. Bạn có thể ghi lại toàn bộ màn hình máy tính hoặc một phần cụ thể trên màn hình ngay lập tức. Bạn thậm chí có thể ghi lại nhiều nội dung khác nhau, chẳng hạn như cuộc gọi video, video, cuộc họp zoom, trò chơi, video hướng dẫn, v.v. Thêm vào đó, nó có thể cung cấp quy trình ghi không gặp sự cố. Bạn có thể sử dụng trình ghi này dễ dàng và trơn tru nếu bạn là người dùng không chuyên nghiệp hoặc có kỹ năng.
Hơn nữa, bạn có thể cải thiện tệp của mình sau quá trình ghi màn hình và âm thanh. Bạn có thể nén, cắt, cắt bớt và thay đổi định dạng video. Với điều đó, bạn có thể có được kết quả mong muốn trước khi lưu video trên máy tính của mình. Vì vậy, để tìm hiểu cách ghi màn hình có âm thanh trên Windows, hãy kiểm tra các bước dưới đây.
Bước 1Truy cập AVAide Screen Recorder trên máy tính Windows của bạn. Nhấn vào các nút bên dưới để tải xuống và cài đặt phần mềm trên máy tính của bạn ngay lập tức.

Hãy thử nó Đối với Windows 7 trở lên
 An toàn tải
Hãy thử nó Dành cho Mac OS X 10.13 trở lên
 An toàn tải
Bước 2Sau đó, chọn cách bạn muốn ghi lại màn hình của mình. Bạn có thể chọn Đầy hoặc là Phong tục. Sau đó, bật Hệ thống âm thanh để ghi lại màn hình của bạn kèm theo âm thanh.

Bước 3Để bắt đầu ghi lại màn hình của bạn bằng âm thanh, hãy nhấp vào GHI nút. Sau ba giây, chương trình sẽ bắt đầu quá trình ghi âm. Sau đó, nhấp vào Ngừng lại để hoàn tất việc ghi lại màn hình của bạn.

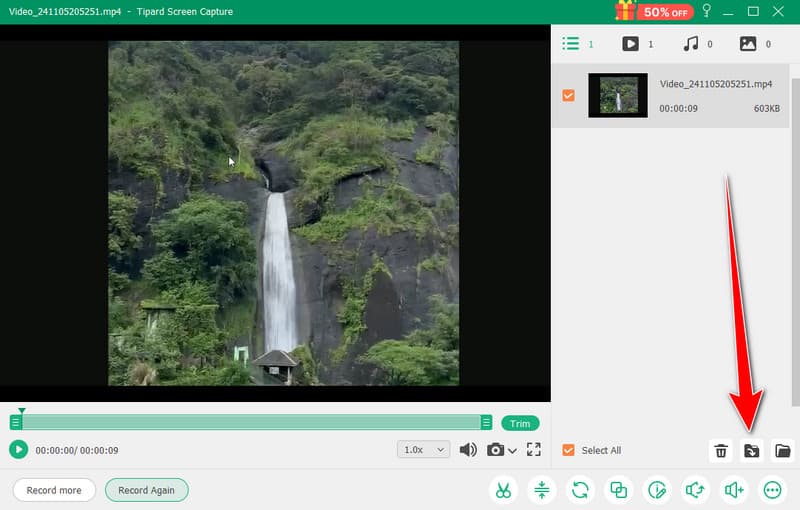
Bước 4Nhấn vào Nhập khẩu nút ở giao diện phía dưới để lưu màn hình đã ghi lại.
2. Sử dụng OBS để ghi lại màn hình có âm thanh
Quan sát là một trong những trình ghi màn hình mã nguồn mở tốt nhất để ghi lại màn hình của bạn với âm thanh. Đây là một trong những chương trình phổ biến mà bạn có thể tin tưởng để có được kết quả mong muốn. Thêm vào đó, nó có khả năng ghi lại nhiều tệp phương tiện khác nhau trên màn hình của bạn. Bạn thậm chí có thể ghi lại các tab, cửa sổ, trò chơi khác nhau, v.v. Nếu bạn muốn ghi lại màn hình máy tính của mình một cách hoàn hảo trong khi vẫn có chất lượng tuyệt vời, hãy sử dụng OBS ngay lập tức. Nhược điểm duy nhất ở đây là giao diện có thể rõ ràng hơn. Nếu bạn là người mới bắt đầu, tốt nhất là nên nhờ những người chuyên nghiệp sử dụng phần mềm. Nếu bạn muốn tìm hiểu cách ghi lại màn hình trên Windows 10 với âm thanh, hãy làm theo quy trình dưới đây.
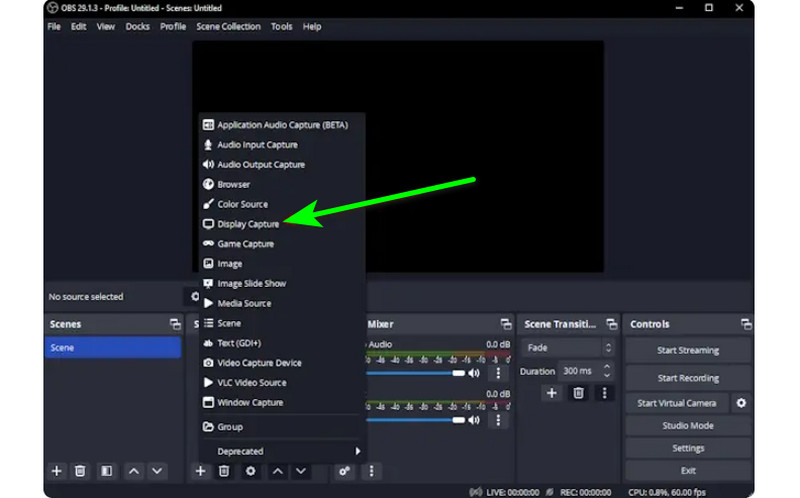
Bước 1Khởi chạy Quan sát chương trình sau quá trình cài đặt. Sau đó, hãy đi đến Thêm biểu tượng bên dưới và chọn Hiển thị Chụp Tùy chọn. Bạn có thể chọn nội dung bạn muốn ghi lại trên màn hình.
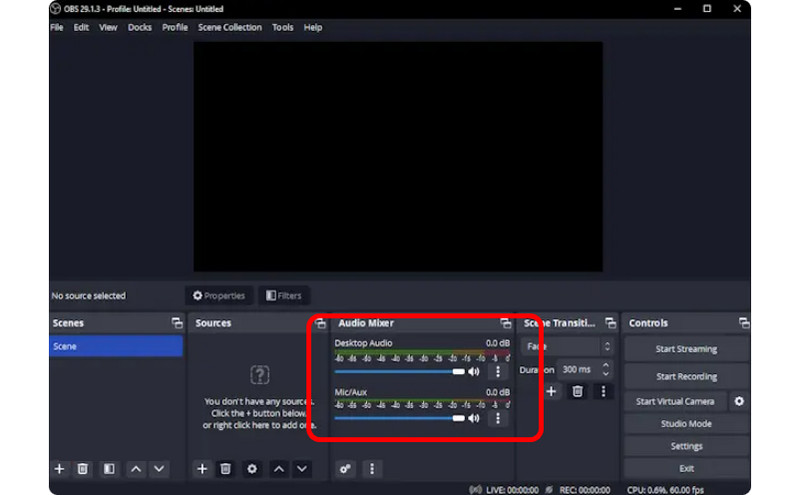
Bước 2Sau đó, đi đến Bộ trộn âm thanh và bật Âm thanh để bạn có thể ghi lại màn hình có âm thanh.
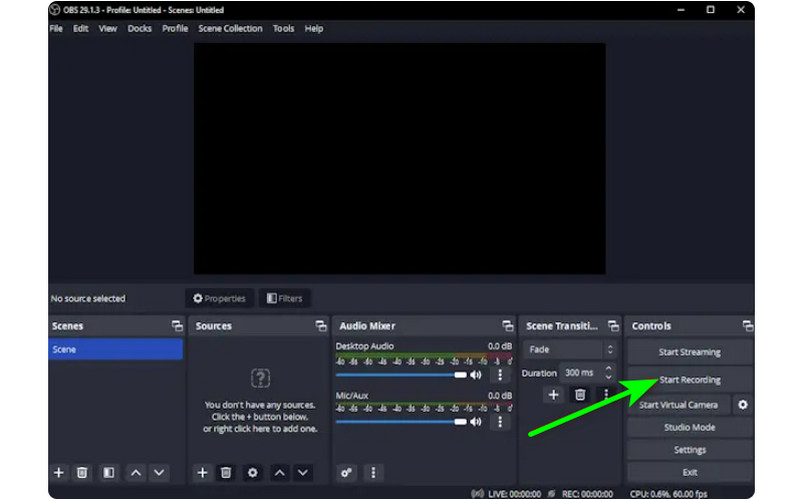
Bước 3Nhấn vào Bắt đầu ghi âm tùy chọn trên giao diện bên phải để bắt đầu ghi lại màn hình của bạn. Nếu bạn muốn dừng quá trình ghi, hãy nhấp vào Dừng ghi cái nút.
3. Sử dụng Clipchamp để ghi lại màn hình có âm thanh
Bạn có muốn tìm hiểu cách ghi lại màn hình trên Windows 11 bằng âm thanh không? Sau đó, hãy sử dụng Clipchamp như trình ghi màn hình tuyệt vời của bạn. Phần mềm hữu ích này cho phép bạn ghi lại màn hình của mình với âm thanh một cách mượt mà vì nó có một quy trình đơn giản mà bạn có thể thích. Bạn thậm chí có thể bật webcam của mình nếu muốn. Nó hoàn hảo để bình luận về nội dung cụ thể hoặc tạo video hướng dẫn. Vì vậy, để bắt đầu tìm hiểu cách ghi màn hình trên Windows, hãy xem các phương pháp bên dưới.
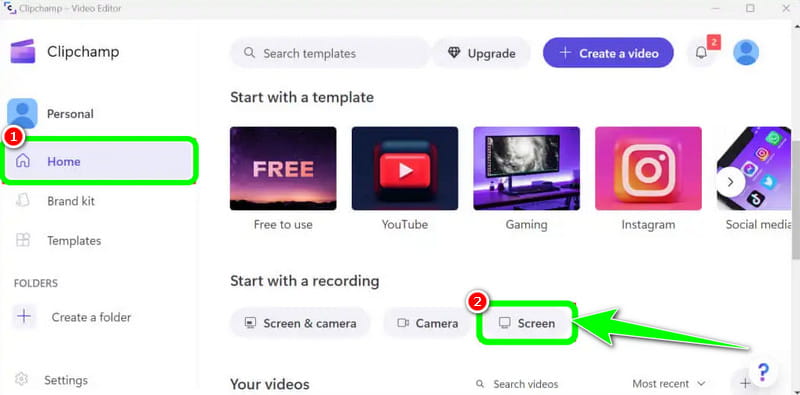
Bước 1Từ giao diện chính của Clipchamp, điều hướng đến Trang chủ phần và nhấp vào Màn hình Tùy chọn. Sau đó, một trang web khác sẽ xuất hiện trên màn hình của bạn.
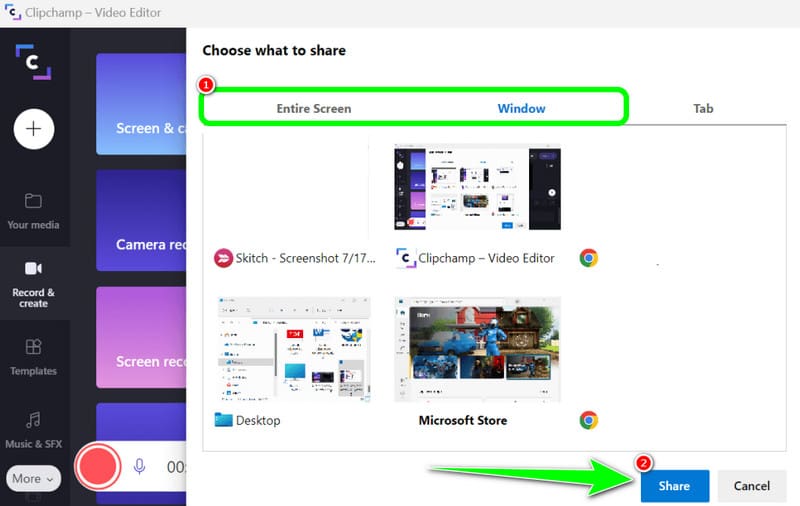
Bước 2Sau đó, nhấp vào Màu đỏ từ giao diện bên trái. Sau đó, bạn sẽ thấy tất cả nội dung trên màn hình, chẳng hạn như tab, cửa sổ, v.v.
Bước 3Nhấp vào màn hình bạn muốn ghi lại, chẳng hạn như Toàn bộ màn hình, Cửa sổ và Tab. Để bắt đầu ghi, hãy nhấp vào Chia sẻ nút. Sau đó, sau quá trình, nhấp vào Dừng ghi để lưu màn hình đã ghi lại trên máy tính của bạn.
Phần 3. 2 Cách Ghi Âm Thanh Trên Windows 10 Và 11
1. Ghi âm bằng Audacity
Bạn có muốn học cách ghi âm trên Windows 10 không? Nếu vậy, hãy sử dụng Audacity. Phần mềm ngoại tuyến này có thể giúp bạn ghi lại bất kỳ âm thanh nào từ máy tính của bạn. Thêm vào đó, bạn sẽ không thấy khó khăn vì phần mềm có thể cung cấp một quy trình dễ dàng, khiến nó trở thành trình ghi âm lý tưởng cho tất cả người dùng. Vì vậy, để bắt đầu ghi âm, hãy xem các bước chúng tôi đã cung cấp bên dưới.
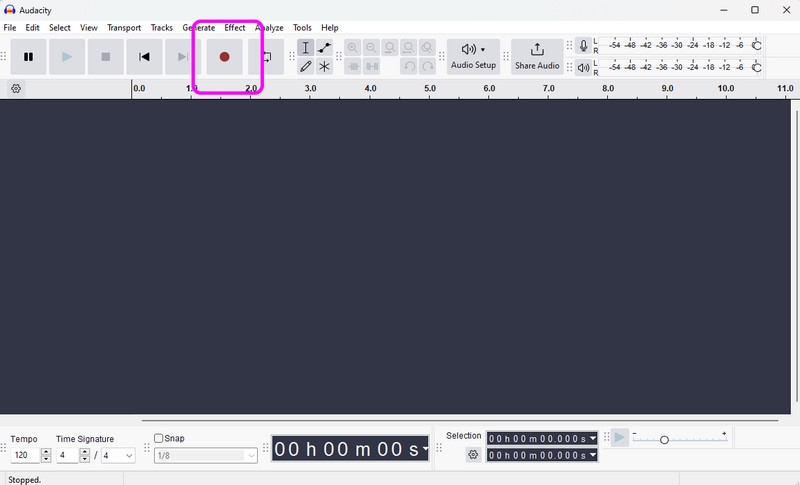
Bước 1Cài đặt và chạy Audacity trên Windows của bạn. Sau đó, từ giao diện chính, nhấp vào Ghi từ giao diện trên cùng. Sau đó, quá trình ghi âm sẽ bắt đầu.

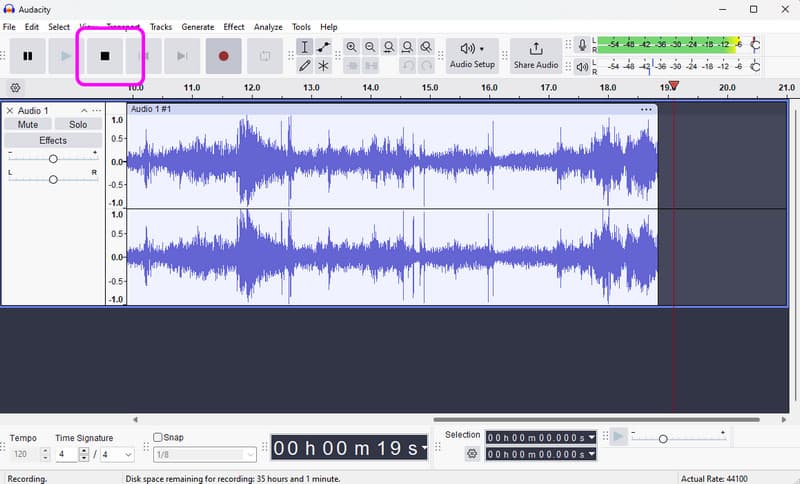
Bước 2Sau đó, nếu bạn đã ghi xong, hãy nhấp vào Ngừng lại nút. Sau đó, bạn có thể tiến hành quy trình lưu.
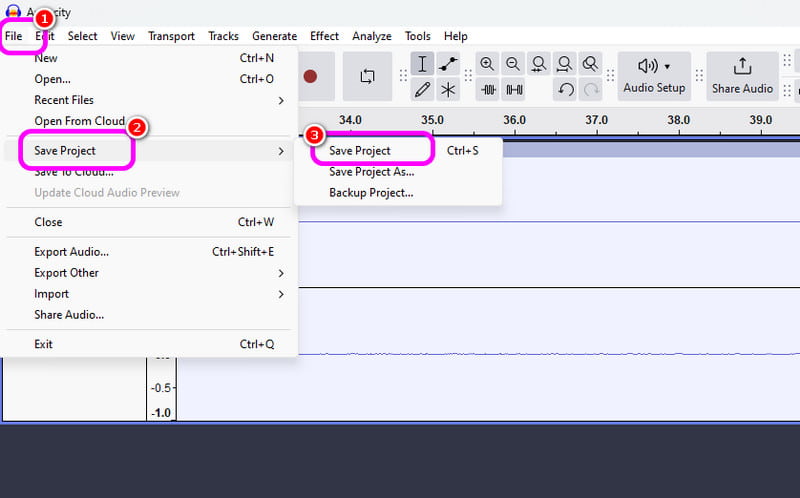
Bước 3Để lưu âm thanh đã ghi, hãy đi đến Tập tin > Lưu Dự án phần lưu tệp âm thanh cuối cùng trên thiết bị của bạn.
2. Ghi âm bằng Windows Voice Recorder
Một phần mềm khác có thể cung cấp cho bạn một quá trình ghi âm thanh Windows mượt mà là Máy ghi âm Windows. Sau khi bạn truy cập vào trình ghi âm này, bạn có thể bắt đầu ghi lại bất kỳ nội dung âm thanh nào từ thiết bị của mình. Điều chúng tôi thích ở đây là giao diện đơn giản để bạn có thể ghi âm dễ dàng và nhanh chóng. Nhược điểm duy nhất là nó không cung cấp các công cụ chỉnh sửa để nâng cao âm thanh đã ghi của bạn.
Bước 1Tải về Máy ghi âm Windows trên thiết bị của bạn. Sau đó, khởi chạy nó để bắt đầu quá trình.
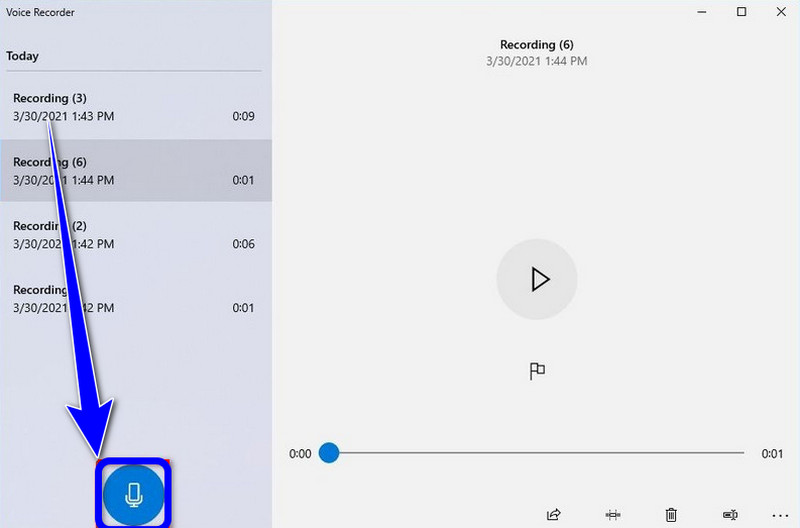
Bước 2Từ giao diện chính, nhấp vào Cái mic cờ rô biểu tượng để bắt đầu quá trình ghi.
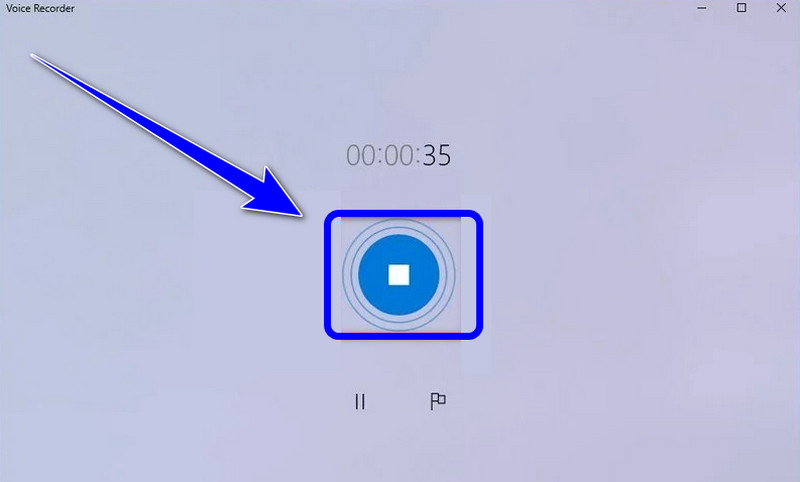
Bước 3Để dừng quá trình ghi âm, hãy nhấp vào Ngừng lại nút. Sau đó, bạn có thể nghe lại âm thanh đã ghi âm.
Nếu bạn muốn học cách ghi màn hình trên Windows có âm thanh, bạn có thể lấy tất cả các chi tiết từ bài đăng này. Vì vậy, hãy xem tất cả thông tin và thử quy trình để có quy trình ghi màn hình và âm thanh hiệu quả. Ngoài ra, nếu bạn muốn phần mềm đáng tin cậy nhất giúp bạn ghi lại màn hình có âm thanh hoàn hảo, thì không còn nghi ngờ gì nữa, AVAide Screen Recorder là chương trình tốt nhất mà bạn có thể truy cập. Vì vậy, hãy chạy phần mềm trên Windows của bạn và tận hưởng các khả năng tổng thể của nó.
Ghi lại màn hình, âm thanh, webcam, trò chơi, cuộc họp trực tuyến, cũng như màn hình iPhone / Android trên máy tính của bạn.


