If you consider yourself a novice in using Mac, then you probably don’t know about its Image Capture on Mac. Well, that’s pretty normal because even some of those who have been using Mac for quite a while now still don’t know about it. Is it used for image capturing, as its name suggests? Is it free to use? How does it work? Those are just a few of the questions running in the minds of the Mac users we know the moment they heard about this app. It is why we have decided to create this article post to guide someone like them or even you who are looking for an answer to the questions made about the app.
Also, this article will answer everyone’s question about can’t find Image Capture on my Mac and some issues encountered by the users who know this app. Therefore we bring forth the best solution for such an issue. With this being said, let’s not prolong this further and proceed to the much-awaited content below.
Part 1. What is Mac’s Image Captured Precisely
Image Capture is one of Mac’s accessible apps. It is a pre-installed program that is intently made to help Mac users to scan and import images from a different external source without the help of drivers. In other words, if you need to scan a document or photo or instead transfer them from your iPhone to your Mac, then this free Image Capture of Mac is the one to use. Furthermore, aside from the mentioned purposes, this mini app also works to designate an application that will automatically open when you connect a particular device to your Mac. In addition, Image Capture also comes with valuable features and editing tools for your photo files, such as crop, rotate, and a contact sheet maker.
Part 2. How to Find Image Capture
Image Capture is one of those apps that are hidden. This is the reason why many first-time users of Mac or even long-time users don’t know this app exists. This is why, in this part, we will show those who can t find Image Capture on Mac the guidelines to see it.
How to Find Image Capture Using Finder
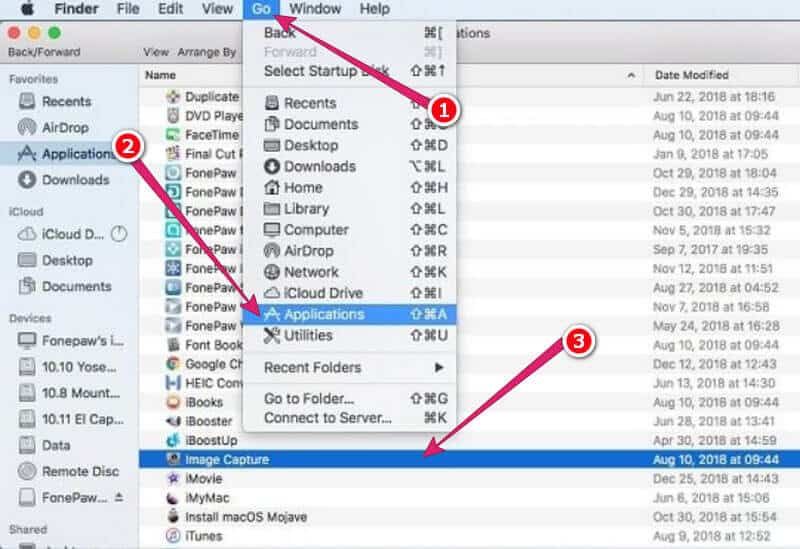
Step 1Launch Finder on your Mac and then hit the Go menu.
Step 2From the menu selection, choose and click the Applications option.
Step 3Then look for the Image Capture from the list of applications.
How to Find Image Capture Using Launchpad
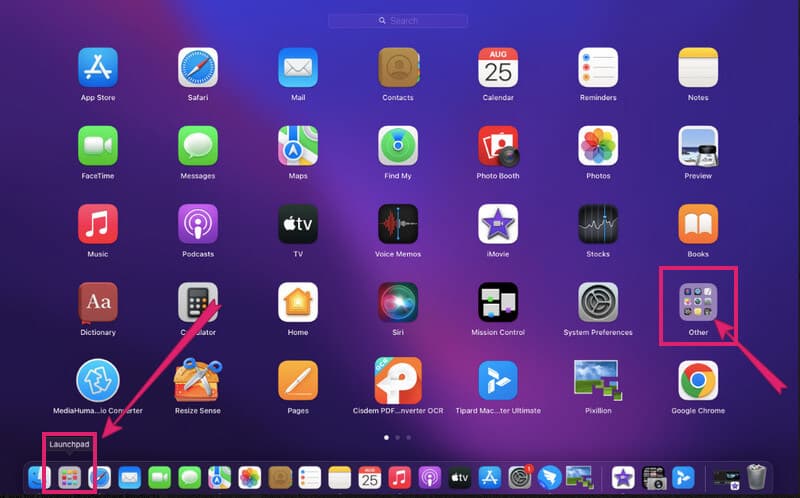
Step 1Launch Launchpad by hitting its icon on your Mac’s dock.
Step 2From the Launchpad’s page, look and click the Other folder. This folder is the default location of the Image Capture.
Step 3In the folder, find the Image Capture and hit it to launch.
How to Find Image Capture on Mac Using Spotlight
Step 1On your main screen, look for the Spotlight tool. The magnifying glass icon is usually found on the ribbon part of your Mac
Step 2Launch it, and start typing Image Capture to search.
Step 3Click the app once it is shown in the search result.

Part 3. Best Solution When Image Capture Not Working
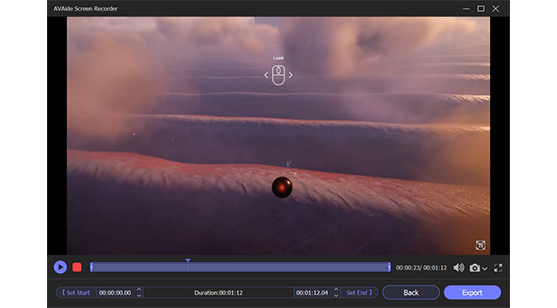
Based on our experience, we can say that Image Capture is not that accurate. Why? Because it works perfectly fine for other users, but many are unfortunate to experience problems with it. One of the primary problems is that this Image Capture on Mac fails to work, or it literally does not open. However, we have the best solution for you if you want to capture screenshots on your Mac, and that is by using AVAide Screen Recorder. It is the best screen recorder that you can have for Mac and Windows. It functions excellently in recording videos, webcams, and audio by producing a lossless quality of outputs. On top of that, it comes with a Screen Capture tool that contains extensive drawing materials and other editing tools for your captured images. In addition, it lets you export your screenshots with various image formats such as PNG, JPEG, JPG, BMP, TIFF, and GIF!
So, if you can’t open the Image Capture, then download this AVAide screen Recorder instead. Because not to mention, it captures your screen without imprinting a watermark on it. Imagine you can also create a picture-in-picture video and take a screenshot. We are trying to instill that it can be of many purposes since it is the multifunctional software that no one should miss.
- Record video, movie, windows, webcam, and audio with high quality.
- Capture your screen with its awesome screen capture tool.
- Plenty of formats for your outputs to choose from.
- No watermark, no ads, and no hassle while using it.
- Reliable and safe for your Mac.
How to Use AVAide Screen Recorder to Capture Screen
Step 1Freely download and install this excellent screen recorder on your Mac. Don’t hesitate to do so because we assure you that it won’t harm your Mac since it is one hundred percent safe.
Step 2Launch the software, and click the Screen Capture tool on the interface.

Step 3After that, a dragging bar will appear. Adjust that bar to capture only the portion of your screen that you want to capture. But take note that you can freely customize the bar without restrictions. In addition, a floating window of the editing tools will appear after selecting a region for screen capturing.
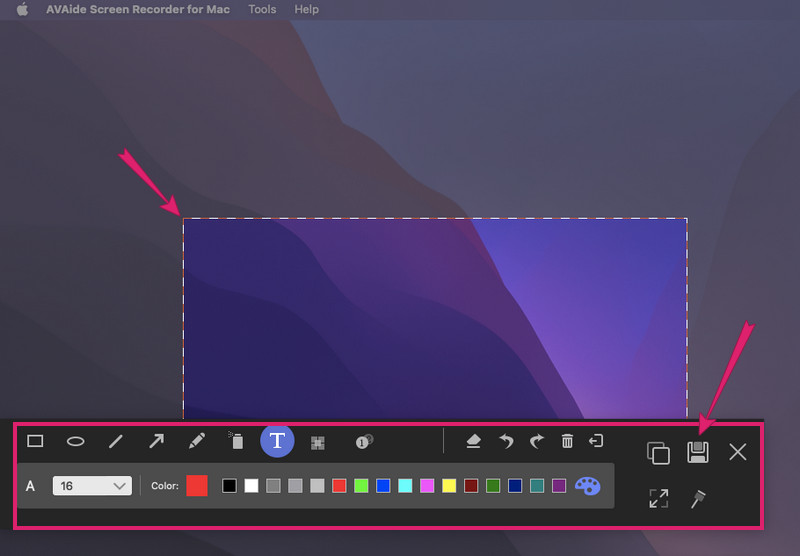
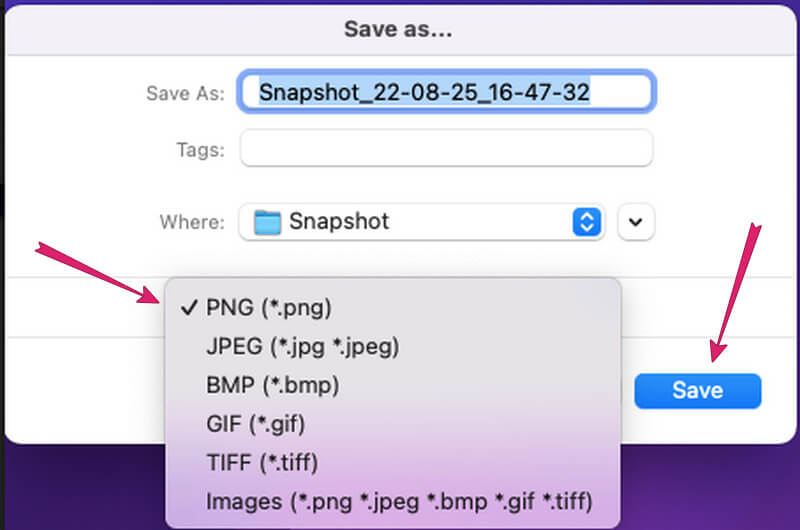
Step 4Then, store the image by clicking the Save icon from the floating window. After that, select your preferred format on the export window, and hit Save.


![]() AVAide Screen Recorder
AVAide Screen Recorder
Record screen, audio, webcam, gameplay, online meetings, as well as iPhone/Android screen on your computer.
Part 4. FAQs about Image Capture
Where is Image Capture on iMac?
You can find the Image Capture via Spotlight of iMac. This is the fastest way to find it.
How will I transfer files to my Mac with Image Capture?
You must connect your external device to your Mac first. Then, launch the Image Capture and click the device you connected. After that, hit the import button to get the files.
Why does my iPhone shut down while transferring files?
That’s a usual scenario that will happen when transferring huge files.
You now have an idea about Image Capture. Try to use it on your Mac and see for yourself if you won’t have any problems using it. Hence, follow the best solution we present to you for your screen recording tasks.
Record screen, audio, webcam, gameplay, online meetings, as well as iPhone/Android screen on your computer.



 Secure Download


