Compressing an image file is done when you need to reduce the size to make more space on your storage or make file sharing faster. While there are tools online that can do the job seamlessly, you can compress images directly on a photo editing software like Photoshop. If you are a beginner and dread navigating the tool, this article will help you realize how simple it is to compress an image using highly extensive software. Therefore, let's cut all the chase and learn how to downsize an image in Photoshop.
Part 1. How to Compress Pictures in Photoshop
Photoshop, as we all know, is one of the standard, if not, the best photo-manipulating software in the market. This tool allows people to edit photos and unleash creativity, as the sky is the limit. However, since Photoshop is highly recommended for high-quality images, you should also expect to render a high file size. Thankfully, this tool allows users to reduce image size by adjusting the pixels of the images once rendered, making the file size smaller. If you want to know how to shrink an image in Photoshop, refer to the guide beneath.
Step 1Once the Photoshop software is launched on your device, you should import the image you want to reduce the file size. Click the File tab and select Import. From the file folder, select your target photo and hit OK.
Step 2Next, head over to the upper corner of the screen and click the Image tab. Once you drop down the tab, select Image Size. Alternatively, you can press Alt+Ctrl+I on your keyboard.
Step 3Afterward, another panel will appear when you can adjust the Pixels of your image. Go to the Dimensions and enter the values of Pixels you wish to have in your image. As a rule of thumb, the pixels you will put should not be higher than the original value.
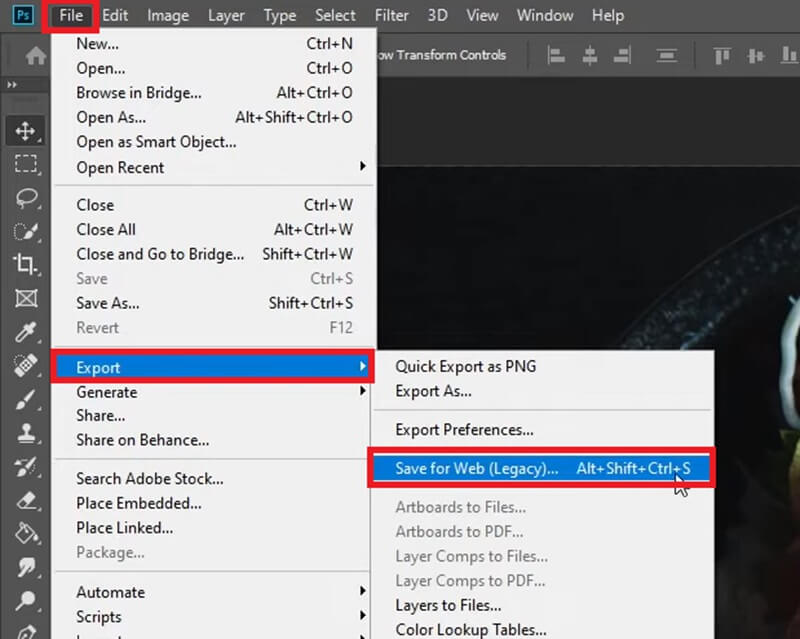
Step 4Finally, hit OK on the screen, and your image file should be reduced in Photoshop. To save your output, go to File > Export and save your image as JPEG.

Can I batch compress images Photoshop?
Definitely, yes! With batch compression, you can trim down image size in large quantities all at the same time.
◆ To do this, you can go to File > Scripts > Image Processor.
◆ Afterward, select the Folder where your photos are located and tick the Open first image to apply settings.
◆ Head over to the Resize to Fit settings and select your target pixels.
Once the parameters are set, hit the Run button for the compression process to start.
Part 2. Limitations of Using Photoshop to Compress Images
Photoshop software is an excellent solution for professionals and even beginners who aspire to enhance their photo editing skills. However, when compressing images is what you are after, Photoshop may not be the first tool you would utilize. Since this works best for manipulating images, you can use online tools to compress images easily. Besides the fact that Photoshop may not be navigated easily by a beginner, here are the following limitations you might encounter.
Limited to computer devices- this software can only be installed on computer devices when compressing images in Photoshop. Therefore, compressing an image is impossible when you only have a mobile phone at your disposal. On top of that, the tool shall be upgraded to the paid version once the trial runs out.
Requires Photoshop skills- For non-tech-savvy individuals, this may be intimidating to use when Photoshop reduce picture size. Moreover, users must have a brief background about setting Pixel values in their photos.
A different way to batch compression- batch compressing images in Photoshop is feasible but you need to take a different step. With this in mind, beginners may need to reconsider using the software as it can take a long time to process images when compressing images manually.
Part 3. The Best Compressor Online: Photoshop Alternative
With all the above mentioned limitations to compress an image in Photoshop, this should not disqualify the software from your compressing tool options. However, if you want to get rid of any possible aberrations in your compressing needs, an online tool like AVAide Image Compressor is what you need. This tool works perfectly on any device, making compression accessible on computers, tablets, and mobile phones. On top of that, AVAide Image Compressor Online is suitable for working with folders of images, thanks to its batch compression feature. You can compress up to 40 images and reduce image file size in one click.
More so, AVAide Image Compressor Online is dedicated to retaining an almost close quality to your original file. Using advanced algorithms, the tools automatically compress the pixels on your images without manually controlling the resolution. This way, you get an excellent output with a minimum file size taken on your device. Having learned how to compress a photo in Photoshop, here is how AVAide Image Compressor Online works.
Step 1Land on AVAide Image Compressor Online
On your device, open your preferred browser and open the image compressor. Alternatively, you can visit the link provided above.
Step 2Upload files
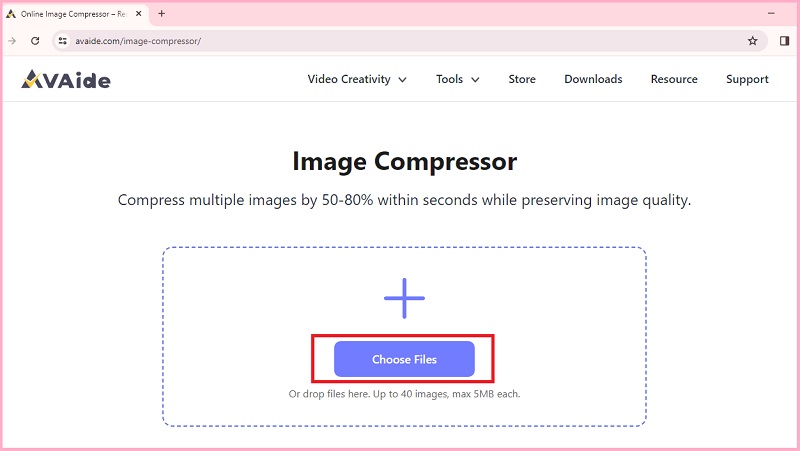
Once the tool launches on your screen, tap the Browse button at the center to access your local file directory. Afterward, select the photos you wish to compress and then hit OK. You can upload photos in various formats like JPG, PNG, and GIF.

Step 3Initiate Compression
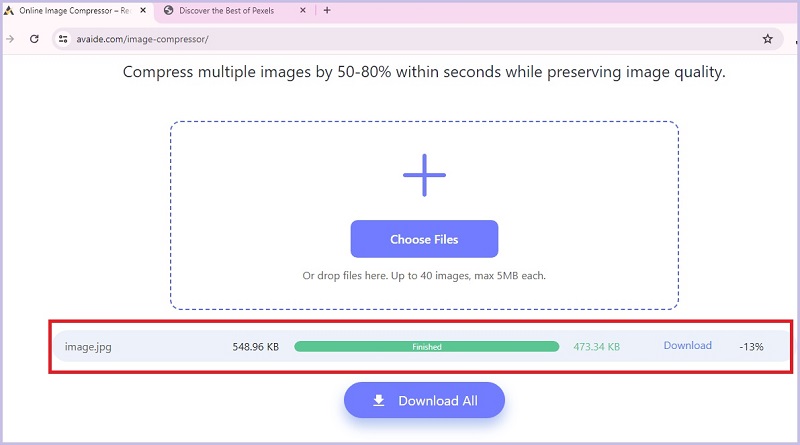
After selecting the photos, the AVAide Image Compressor will automatically trim the files with its algorithm. You may look at the Status bar to see which photos are currently in a compression process.

Step 4Download Reduced Images
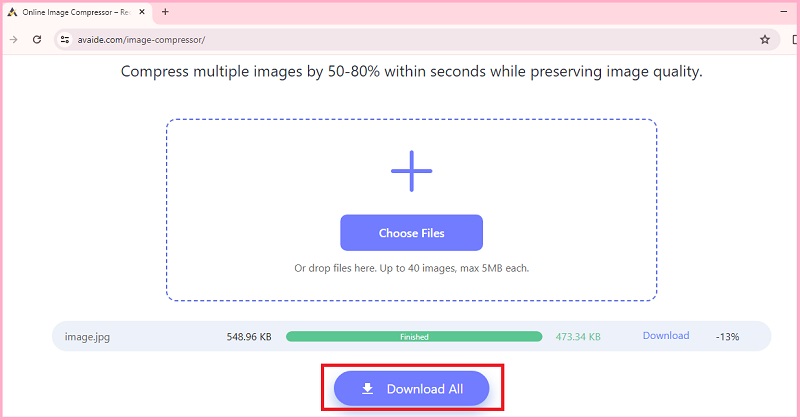
Once the photos are successfully compressed, you may also see the screen amount of reduced image size. To locate the image, hit the Download button.

Part 4. FAQS about Shrinking Image in Photoshop
How do I resize an image without cropping it?
If you wish to diminish the size of your image without trimming the photo itself, you can follow the compression method provided above. This way, you only change the pixels on your image, which minimizes the file size.
Why is Photoshop so expensive?
Photoshop is a professional software best for editing photos. This is the leading tool that offers advanced features when working on more significant projects. Plus, with the maintenance and development needed to provide a satisfactory experience for their customers, this tool may require more prominent resources.
What's better, Lightroom or Photoshop?
Lightroom and Photoshop are good options for unleashing your creative control over images. However, determining which works best depends on your objective. Lightroom is usually preferred by photographers when improving their photos, but for more complex work, Photoshop may have a better advantage.
And that's how to make an image smaller in Photoshop. With this excellent software, you have two options when compressing pictures, either a single photo or working with multiple files. When having your creative work on the tool, you can shrink down the file image directly and take complete control of the output quality. However, if the abovementioned limitations limit your freedom to compress an image, online tools like AVAide Image Compressor are an excellent alternative for your file compression needs.

Reduce the file size of an image online within seconds while preserving the quality. We support JPG, PNG, WEBP, GIF, and more.
PROCESS NOW


