Word is widely used worldwide for sharing documents due to its unique features that cater to users' document preparation needs. Adding watermarks to your documents serves various purposes. These include keeping track of your work, stopping others from stealing your ideas, etc. However, there may be instances when you need to remove these watermarks.
This write-up will teach you how to remove watermarks in Word using various methods. Besides that, it will present a dependable way to remove watermarks from your image before adding them to your document. Keep scrolling to unveil the secrets of watermark removal!
Part 1. How to Remove a Watermark in Word
Ready to uncover the secrets of removing watermarks on Word? Keep reading, and we will guide you through the steps. Your watermark-free documents are just a read away. Keep going to learn more!
1. Watermark Menu
Using the Watermark menu is efficient when eliminating watermarks in your Word document. This built-in feature in Microsoft Word allows you to manage and remove watermarks from your documents easily. It ensures it meets your specific requirements without any unwanted watermarks.
Below are the steps on how to remove the watermark using this method:
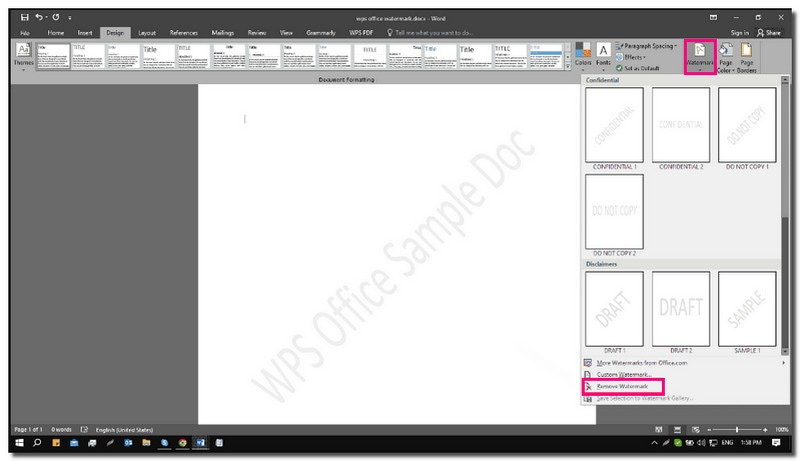
Step 1Open your Word document containing the watermark using Microsoft Word.
Step 2Navigate to the top Ribbon of the Word screen and click on the Design tab. Within the Design tab, locate the Page Background section.
Step 3Click the Watermark within the Page Background section.
Note: If you are using Windows, choose Remove Watermark from the Watermark menu. For Mac users, select No Watermark at the top of the Insert Watermark window.
Step 4Once settled, confirm your selection. Afterward, Word will promptly delete the watermark from your document.
2. Edit Header
If you need to remove a watermark from a Word document, a practical approach involves editing the document's header. By going into the header section, you gain access to the underlying elements of your document, including the watermark. This method provides an accessible way to modify or eliminate watermarks. It offers flexibility in tailoring your document to your preferences.
Below are the steps on how to remove the watermark using this method:
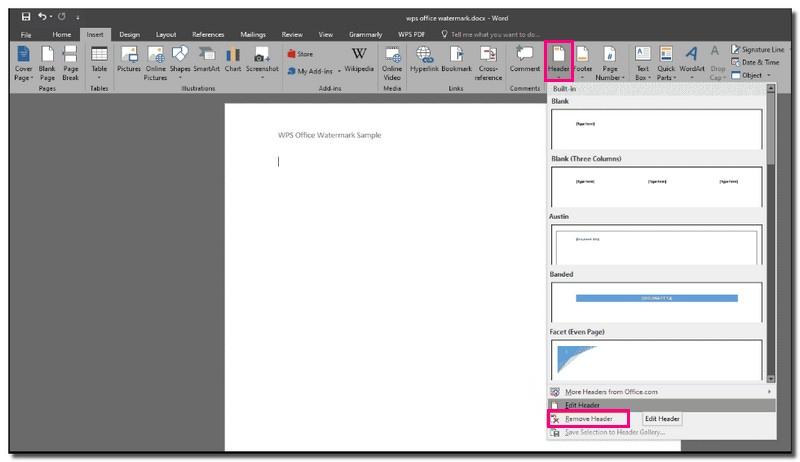
Step 1Open your document in Microsoft Word.
Step 2Navigate to the top Ribbon of Word and click the Insert tab. Within the Insert tab, find the Header & Footer section.
Step 3Click the Header option. If you prefer, you can choose the Footer option instead. A menu will open, and at the bottom of this menu, click the Edit Header.
Step 4Your document's header is now editable, granting access to the watermark. Locate the specific watermark you wish to remove within your document and click on it.
Step 5While the watermark is selected, press the Delete key on your keyboard. Afterward, Word will effectively remove the chosen watermark from your document.
3. Save XML
Removing a watermark from your document can be saved by saving it in the XML format. It allows you to access and edit the document's underlying code. This method uses Microsoft Word to open and save the file, followed by Notepad to make the necessary adjustments.
Below are the steps on how to remove the draft watermark from Word using this method:
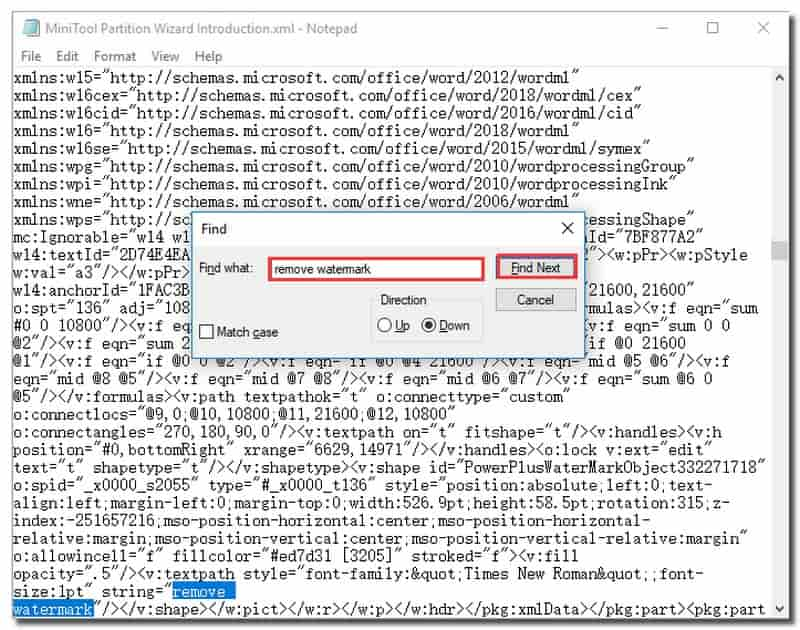
Step 1Open your document using Microsoft Word and save it in the XML format.
Step 2Open the saved document using Notepad.
Step 3Press the Ctrl + F keys to access the Find function once the document is open.
Step 4In the Find window, type the phrase in the watermark and click the Find Next button. Delete only the watermark phrase. Continue to find and delete until all instances of the watermark phrase are removed.
Step 5Save the changes and then reopen the file with Word.
Part 2. How to Remove Image Watermark Before Adding to Word
There is an image you want to use in your Word document. However, there is an annoying watermark that spoils the picture. It is where AVAide Watermark Remover steps in as your reliable solution. This fantastic photo editor is designed to erase any watermarks from your photos. It ensures that your images remain pristine and professional before being added to your Word document.
It offers multiple removal options, including the brush, lasso, polygonal, and crop. These options allow you to customize the watermark removal process according to your preferences. The watermark removal process is fast because it uses hardware acceleration. Moreover, it is a virus-free, ad-free, and risk-free platform. It provides you with a trustworthy environment for your watermark removal needs.
Step 1Visit the official AVAide Watermark Remover website to access the platform.
Step 2Click the Choose a Photo button to upload the image with the watermark you wish to remove.

Step 3AVAide Watermark Remover offers three options to remove watermarks from the image: Brush, Lasso, and Polygonal.
You can use the Brush to mark the watermark and modify the brush size if needed. If you prefer to draw around the watermark, you can use Lasso. The Polygonal enables precise selections with straight lines. If there are unwanted highlights, you can use the Eraser to remove them.
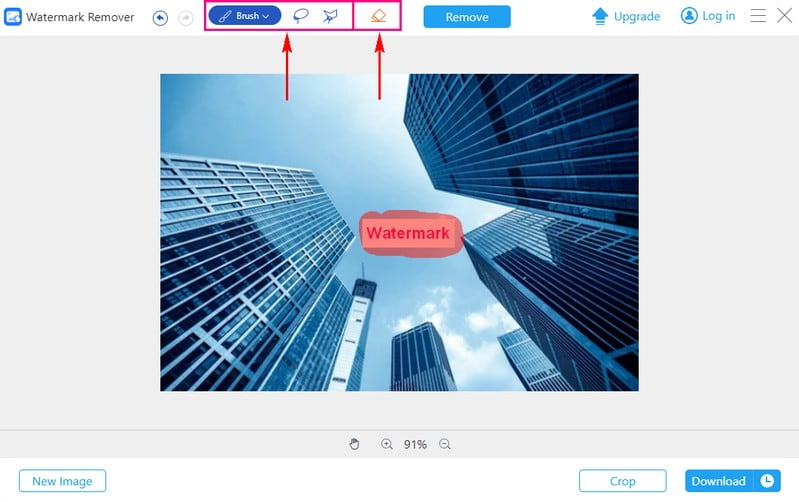
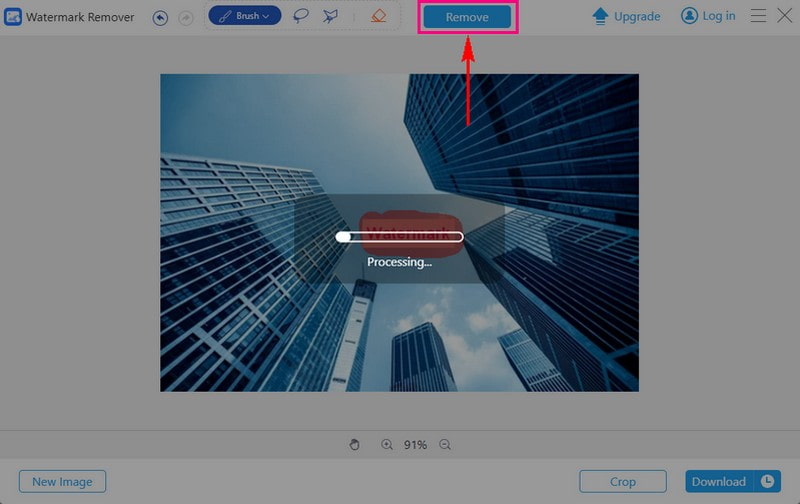
Step 4Hit the Remove button after highlighting the watermark. AVAide Watermark Remover will initiate the process, and your picture will be watermark-free. With this convenient feature, you can also remove Instagram watermark easily.
Step 5Press the Download button to save the watermark-free image to your local folder once satisfied with the result. Now, you can confidently add your image to your Word document without any watermark.

Part 3. FAQs about Removing Watermarks in Word
Why can I not remove the watermark on my Word document?
At times, users may need help to get rid of the watermark in a Word document because of specific document settings. In such cases, a particular method is needed to remove the watermark manually.
Does removing a watermark affect the original formatting of the document?
The remove watermark option in Word does not mess with how your document looks initially. It only removes the watermark and ensures the formatting stays the same without disruptions.
Can I remove a watermark from a document on my phone or tablet?
Yes, you can. Open the document, tap on the three dots, go to Design, and then look for the Watermark option. You can remove or customize the watermark from there.
Can I remove a watermark from a PDF in Word?
Word may not directly edit PDF watermarks. You may need to convert the PDF to Word. Then, remove the watermark and save it as a PDF again.
Does removing a watermark change the document's file size?
No, removing a watermark does not significantly change the file size. The impact on file size is usually minimal because watermarks are lightweight elements in a document.
To sum it up, removing watermarks on Word has many good things. It makes your work look more professional. It ensures that your main project stands out without any distracting marks.
Besides that, AVAide Watermark Remover can help you remove watermarks on your image before adding them to Word. It saves time and energy and makes your presentations, reports, or other documents look better. Give AVAide Watermark Remover a try and see how easy it is to make your content shine without any watermarks!

Easily get rid of annoying watermarks and unwanted objects from your photos without quality loss.
TRY NOW