We can never change the fact that many people worldwide are interested in taking photographs. They find it fulfilling to keep and treasure beautiful moments they see and experience. But how do they deal with pictures with low or not-so-good resolution? You know, there’s always a solution to every problem. And with this matter, the best solution is obviously to change the photo resolution. Since almost all of us use our handy phones to take photos, this article will focus on the perfect ways to enhance Android and iPhone photo resolution.
- Part 1. The Best Way to Enhance iPhone and Android Photo Resolution
- Part 2. How to Increase Resolution of Image on iPhone
- Part 3. How to Change the Resolution of a Picture on Android
- Part 4. How to Transfer Full-Resolution Photos from Android and iPhone
- Part 5. FAQsd about Changing Photo Resolution on iPhone and Android
Part 1. The Best Way to Enhance iPhone and Android Photo Resolution
If you are looking for the best way to change your photo resolution, we highly recommend using the AVAide Image Upscaler. It is a powerful photo-enhancing tool on the web that gives a high-frequency-like tool that changes the picture resolution of Android and iPhone due to the presence of its AI-powered technology. With this being said, all the photos you fix using this tool will be transformed into the most excellent quality they deserve. In addition, as its user, you will not need to make several adjustments to meet your desired enhancement, for it will only require a single click to do that.
Furthermore, this AVAide Image Upscaler supports photos with up to 3000x3000 px. Plus, it can be regarded as a photo enlarger to enlarge your mobile images by up to 8x bigger. You can do it all for free! Free of charge, free of ads, free from watermarks, and free of hassle. On top of that, you won’t need to install any app on your mobile phone, which makes a good impression.
How to Change Image Resolution in Mobile Using AVAide Image Upscaler
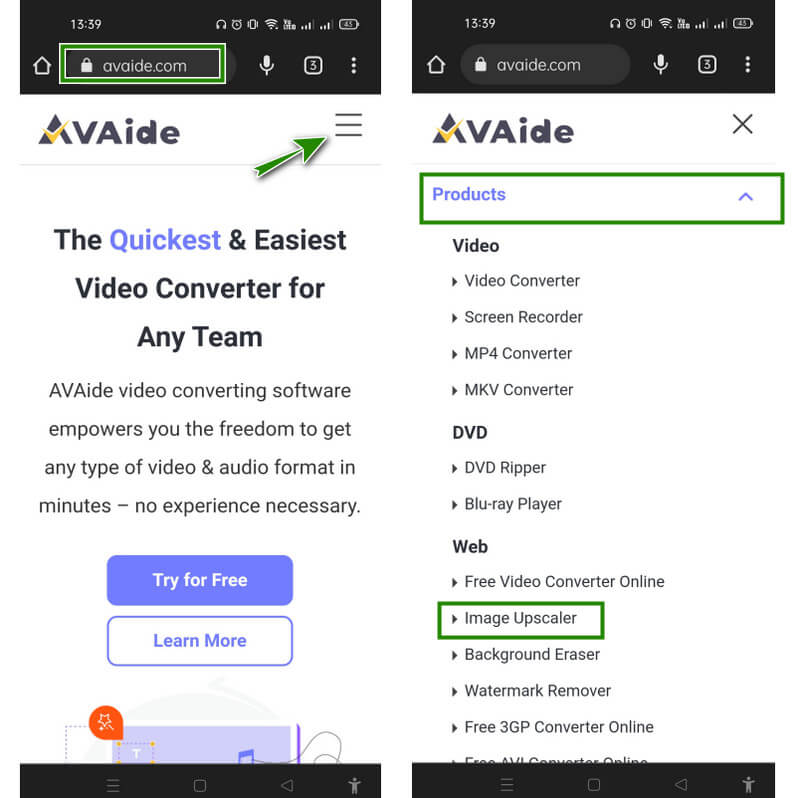
Step 1Explore Your Browser
First, you need to launch your browser, and on the URL tab, type in www.avaide.com. Then, tap the three lines in the upper right corner of the screen to see the Products. Now, tap the arrow drop-down icon of the Product option and select the Image Upscaler from the choices under the Web.

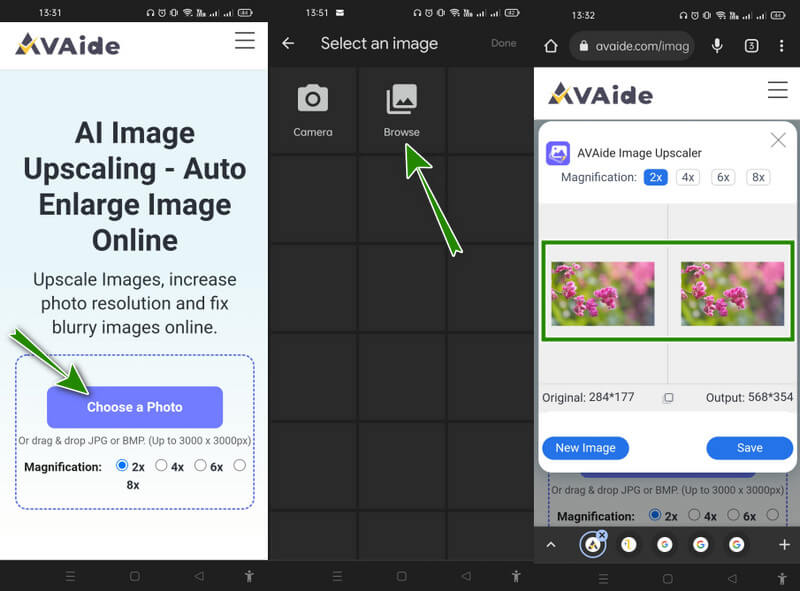
Step 2Choose a Photo
Once you get to the recommended product page, get ready to import the photo you need to fix. Tap the Choose a Photo tab from the page, and select the image from your gallery. Note that if you have difficulty finding the photo you need, you may hit the Browse option to explore more of your photo storage.

Step 3Optimize the Tool
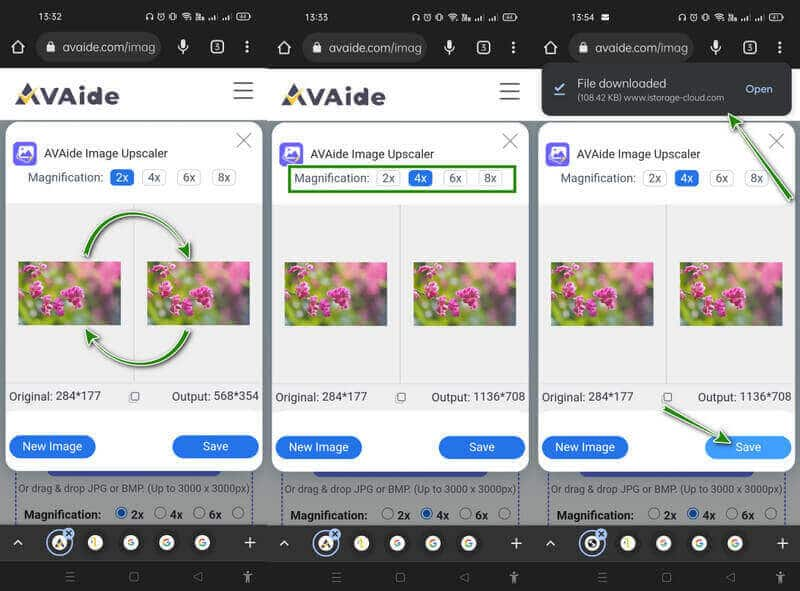
As you see, it takes less than a minute to load the photo. This is because the tool already enhances the picture during the loading process. Once the image has been loaded, you will already see the difference via preview. Still, you have the choice to optimize the tool by applying more magnification located on top of the preview.

Step 4Acquire the Output
Finally, you can now hit the Save button to acquire the newly enhanced photo. You will notice that the saving process will lead you to download the file. After that process, you can now check your photo gallery for your new photo.
Part 2. How to Increase the Resolution of Image on iPhone
Good news, in this tutorial, we will somehow teach you the proper settings for your iPhone to increase the resolution of your pictures. By navigating the settings on your iPhone, you will still get to increase the resolution of your photos. How? See the steps below.
Step 1Visit your Settings app and scroll to find the Photos selection. Once you tap that selection, you will need to activate the iCloud Photos, then tap the Download and Keep Originals option.
Step 2Now, go back to the main page of the settings, then tap the Camera option. On the next page, tap the Format setting, but before that, please ensure that the Auto HDR selection is activated.
Step 3In the format settings, tick the High-Efficiency option. Now, you have to save the photos to your iPhone’s Photo app, and in the external storage because if not, you won’t get a higher quality for your photos.

Part 3. How to Change the Resolution of a Picture on Android
If you are an Android user, you know for a fact that unless you use a third-party app, you will not be able to increase the resolution of your existing photo. Even though most Android phones come with photo editing tools, they hardly increase the image’s resolution. However, we have a tip you can follow before capturing photos that will provide you with a high-resolution photograph, and that is by capturing with HDR mode. See the following steps below on how to activate this mode on your Android.
Step 1Launch your camera app. And if you are using modern Android, you will instantly notice the HDR mode is unavailable on other camera modes. HDR is only available in PHOTO shooting mode in the Android we are using.
Step 2Activate the HDR by tapping it. Then, on the option shown, tap the On selection. Now, since it's already activated, you can start taking photos.

Part 4. How to Transfer Full-Resolution Photos from Android and iPhone
Indeed, sending photos through a messenger app reduces the resolution or quality of the files. Therefore, utilizing the right courses is better if you want to share your pictures with your family or friends in full resolution. Proven ways on this matter are listed below.
1. Use the Shareit app.
2. Send the photos via email.
3. Make a Google Drive for the photos and share it.
4. Use AirDrop for iPhones.
5. Use Google Photos.


![]() AVAide Video Converter
AVAide Video Converter
The most comprehensive media converter to convert video & audio & DVD without quality loss.
Part 5. FAQs about Changing Photo Resolution on iPhone and Android
Can I know the photo resolution on Android?
No. Unfortunately, Android phones don’t have the resolution details of a photo. Hence, you will need a third-party app to check it.
What is a good photo resolution?
A good photo resolution depends on the user's purpose. But generally, photos with around 300 dpi are high in resolution.
Will the photo lose the quality after cropping it?
No. Cropping alone will not lose the image quality.
Changing the Android and iPhone’s photo resolution can be achieved in many different ways. On Android, the only way to increase the resolution of the existing photos is by using a third-party app. However, if you have a trust issue with installing an app on your phone, use the best technique in this article, enhance the quality of your JPG/JPEG/PNG photos using AVAide Image Upscaler.
Image Upscaling Tips
- How to Increase Resolution of Image in 3 Popular Ways
- Simple Ways to Improve Quality of Images Instantly
- 5 Ways to Fix a Blurry Picture [For Desktop & Mobile]
- 8 Ways to Increase Photo Resolution Online for Free
- 13 Leading Photo Enhancers to Improve Image Quality
- Easy Convert Low-Resolution Image to High-Resolution Online
- How to Increase Photo Resolution in Photoshop [Step-By-Step]
- Top 10 Best Image Resolution Enhancers Worth the Try
- 10 Outstanding AI Photo Enlarger Tools (100% Free)
- 11 Best Photo Resizers on Different Platforms to Use
- 7 Ways to Resize Image without Compromising Quality
- How to Make Image Bigger: 7 Best Ways to Consider
- How to Fix Picture Quality in 2 Easy Ways (Online & Offline)
- Make a Photo HD: 5 Astonishing Ways to Look Forward Online
- How to Lower Image Quality in 3 Effortlessly Ways
- How to Unblur an Image: For Online and Mobile Platforms
- 5 Simple Ways to Make a Picture Clearer
- How to Enhance JPEG/JPG/PNG Resolution in 5 Best Solutions
- Change the Android and iPhone Photo Resolution in Three Ways

Use the Best Image to 4K Upscaler Online
Our AI technology will automatically enhance the quality of your images, remove noise and fix blurry images online.
TRY NOW


