DPI refers to the amount of dots or pixels presented in an image. The standard image DPI is around 300. What if your photo does not meet this standard DPI? Unfortunately, you will experience issues with print quality, pixelation, etc. This guide will present various methods to increase the photo dots per inch. Let us explore together how to increase photo DPI quickly!
Part 1. What Happens When You Increase Photo DPI
When you increase the dots per inch of a photo, you incorporate more dots or pixels. This process makes the photo clearer, sharper and more detailed. It is recommended if you desire to print out these images or look them up close.
Part 2. Increase Photo DPI on Windows/Mac
Are you a Windows or Mac user looking for ways to increase photo DPI? You are lucky because this section will provide platforms that can help you. Please keep scrolling to learn more!
1. AVAide Image Upscaler
The task of increasing DPI in an image is necessary for various purposes. These include printing, visual presentations, and producing high-quality outputs. The best web-based platform to help you increase photo DPI is none other than AVAide Image Upscaler.
AVAide Image Upscaler can upscale photos, increase resolution, and correct blurry photos. It can help you produce clear, sharper, and more detailed images recommended for printing. It does not matter if your photos contain people, nature, animals, cars, or products. Moreover, it has a built-in one-click enlargement option. You can enlarge your small photo to 2×, 4×, 6× up to 8×.
The impressive thing about it is that it is free to use. You do not need to pay anything to get the output you want. In addition, it does not add a watermark to your edited photo. So, read the steps below to learn how to increase photo dots per inch using it:
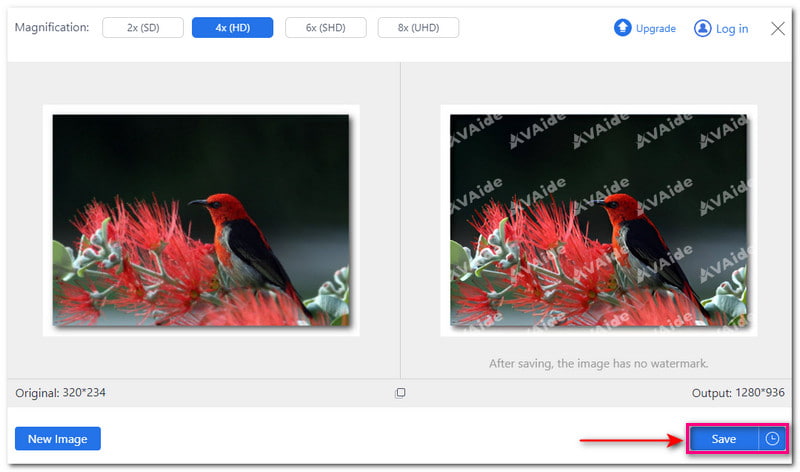
Step 1First, visit AVAide Image Upscaler's official website to have complete access.
Step 2You will see the Choose a Photo button on the interface; please click it. The platform will begin rendering a high-quality photo for preview.
Step 3You will see the original and output pixel dimensions on the lower part of the display. As per the photo below, the original pixel dimension is 320 × 234, which became 640 × 468. The dots per inch of the photo have been increased.
Step 4Select 4×, 6× and 8× from the Magnification option to add more pixels. You will see that the output pixel dimension will increase even more.
Step 5Your original photo transforms into a high-quality one that is perfect for printing. Press the Save button if you are satisfied with the outcome.
2. Photoshop
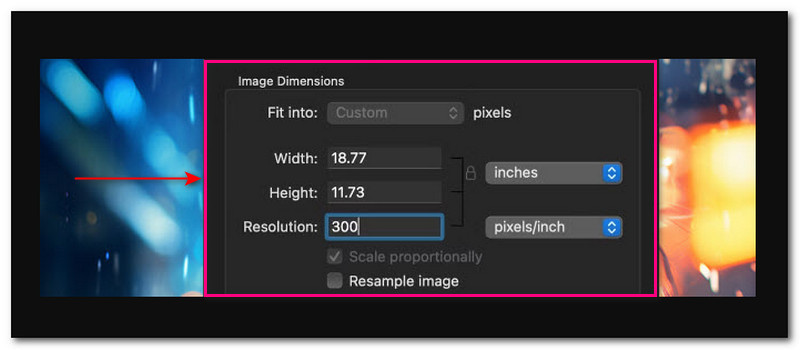
Many users, especially professionals, prefer to print photos using Photoshop. This program allows you to increase the DPI of photos using your computer, whether Mac or Windows operating systems. It has a built-in image size feature, allowing you to see the image file's properties. You can fine-tune the Width, Height, Resolution, etc. However, Photoshop is not easy to navigate, which is not recommendable for first-time users.
Step 1Run the Photoshop on your computer.
Step 2Head to the Image option and select Image Size. This prompt will present the Image Size dialog display.
Step 3Uncheck the Resample Image option. Please ensure to select Pixels/Inch from the drop-down menu. Then, enter a proper DPI into the Resolution option.
Step 4When settled, click the OK button to apply the changes.
Part 3. Increase Photo DPI on iPhone/Android
Can you increase the DPI of a photo using your mobile device? Definitely! This section will provide various ways to achieve that. Please continue scrolling to learn more!
1. Picwand
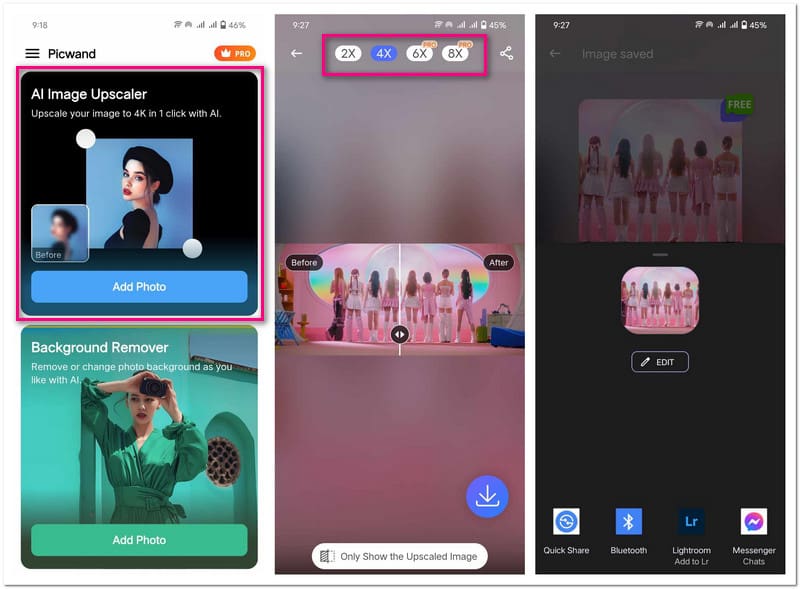
One known DPI increaser mobile application that can boost the resolution of your photos is Picwand. It has a built-in image upscaler that employs cutting-edge artificial intelligence technology to work. It can upscale, recognize blurriness, increase pixel details, improve definition, change color, sharpen images, and refine details. On top of that, it provides enlargement levels to increase pixels. These are 2×, 4×, 6× and 8×. However, the 6× and 8× can only be enabled if you upgrade your plan.
Step 1Run the Picwand application on your mobile device.
Step 2Select AI Image Upscaler from the options presented. This option can help you upscale your image to an ultra-high-definition output.
Step 3Allow the application to access your phone gallery. Then, import the picture you desire to increase the dots per inch.
The application will start processing the image. It will upscale, increase pixel details, sharpen images, refine details, etc.
Step 4Picwand offers an enlargement option. These are 2×, 4×, 6× and 8×. Each enlargement level can increase your photo pixels.
Step 5Once satisfied, click the Save button to save the edited photo on your phone gallery.
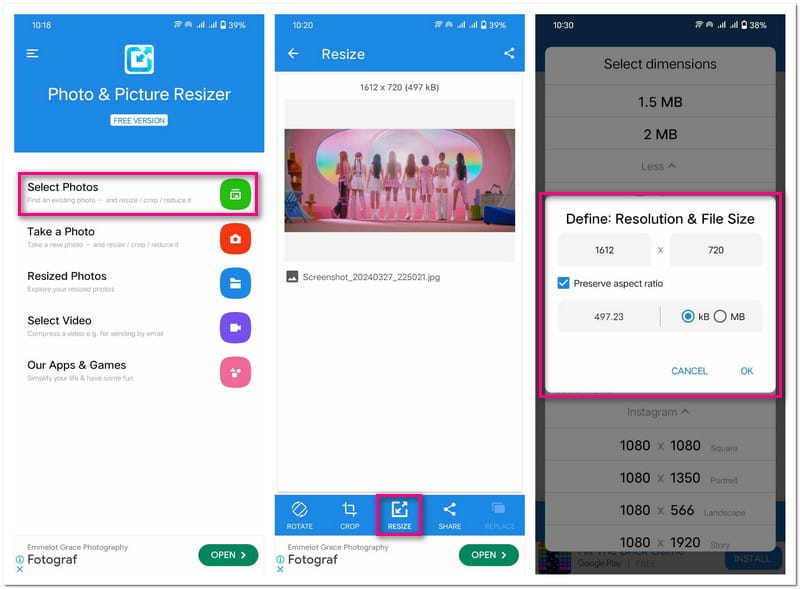
2. Photo & Picture Resizer
Increasing the DPI means incorporating more pixels; Photo & Picture Resizer is here to help you achieve that. This application offers various pre-sets of dimensions. These include Percentage, Width and Height, File Size, Resolution, etc. You have several options to select from to increase the image dots per inch. However, you must watch a short video advertisement to apply your changes.
Step 1Open the Photo & Picture Resizer application on your mobile device.
Step 2Press the Select Photos option. It will open your phone gallery; please select the image you want to increase the DPI. You will see the original pixels above your imported photo. As per the photo below, 1612 × 720 (197 kb).
Step 3Navigate to the Resize button in the lower center of the screen. Under the Percentage (%), you can pick from 10% up to 90%. Under Width × Height, you can pick from 800 × 357 to 4096 × 1829. Under File Size, you can pick from 100 KB up to 2 MB. These options will determine your photo's resolution and size, increasing the DPI.
Step 4Once selected, Photo & Picture Resizer will automatically save your edited photo on your local file.
Part 4. FAQs about Increasing Photo DPI
How to change DPI in Microsoft Paint?
Unfortunately, Microsoft Paint has no built-in feature to change an image DPI. But you can check the DPI by heading to File and then Properties.
Is it okay to use 1000 DPI?
The answer lies down on your printer. Most printers support up to 1200 dots per inch. However, a higher DPI than 1000 may cause issues for users.
Does increasing DPI make your photo file larger?
Yes! Increasing DPI will make the photo file larger. It is because you will add more data or dots to the photo.
Should I use 72 or 300 DPI?
A 300 DPI image is considered a high-quality print image. The higher the dots, the higher the quality. In contrast, 72 DPI is not recommended for print because it will only appear pixelated.
Does DPI affect file size?
Changing the DPI of a photo does not affect the file size. This is because DPI is a measure of print quality.
Can you increase the DPI of a photo? Of course! You have discovered the reliable methods above! These methods can help you improve image details. It makes them perfect for printing, presentations, etc. Among these methods, AVAide Image Upscaler stands out as the best choice. It employs advanced artificial intelligence technology to improve image clarity and increase photo DPI. Let us know your thoughts in the comment section!

Our AI technology will automatically enhance the quality of your images, remove noise and fix blurry images online.
TRY NOW