Part 1. Photo Enlargement Sizes and Other Requirements
Sustaining quality while enlarging an image is a problematic aspect of navigating. Different characteristics like DPI, resolution, and file format significantly impact the clarity of prints. This portion highlights the essential requirements to avoid pixelation when enlarging images.
DPI (Dots Per Inch) and Print Quality
Print clarity is significantly impacted by DPI. Images that have a low DPI are prone to pixelation while being printed. On the other hand, high-DPI images preserve their detail. Increasing the DPI on the image before printing resolves this issue.
| DPI Range | Quality Level | Recommended Usage |
| 72 DPI | Low (Web quality) | Not suitable for printing |
| 100-150 DPI | Medium (Acceptable for small prints) | Small prints, basic posters |
| 150-300 DPI | High (Good quality) | Standard photo prints, detailed posters |
| Above 300 DPI | Very High (Professional quality) | Large wall art, professional prints |
Resolution & Pixels Consideration
A sharp source image is required to ensure that an image is not of low quality after enlargement. Sharp photos have a greater pixel count, which allows them to maintain their detail when enlarged.
As an example, an image that is 3000×2000 pixels and is intended to be printed on a 300 DPI paper will have the following dimensions:
• Width: 3000 ÷ 300 = 10 inches
• Height: 2000 ÷ 300 = 6.67 inches
If one tries to print this image more significant than the stated dimensions, a certain amount of pixelation will be evident.
Print Size Guidelines
| Print Size | Recommended DPI |
| 4×6 inches | 150-300 DPI |
| 8×10 inches | 200-300 DPI |
| 16×20 inches | 250-300 DPI |
| 24×36 inches | 300+ DPI |
Other Important Factors
• Sharpening Techniques: Masking an image can significantly enhance the overall clarity of the picture; thus, sharpening techniques are best suited for images before printing.
• File Formats: JPEG images should be avoided as they are prone to losing quality when resized. PNG, TIFF, or RAW are the more suited alternatives as they retain the image details.
• Performance Evaluation: Increasing the size of the images calls for a computer with adequate RAM and a powerful CPU.
Part 2. Notes When Enlarging Photo for Printing
Blurry images with fading details can appear simply because of scaling up a photo. This section discusses tips on making enhancements in sharpening a picture, changing the file type, and ensuring the best quality prints possible. Learn how to improve clarity, reduce pixelation, and pick the best software for image resizing.
Best Practices of Image Enlargement
Here are some essential tips for maintaining quality while enlarging an image.
1. Pick a Good Image: Always check the resolution of a photo before enlarging it. Blurriness may occur if the resolution is set too low.
2. Use the Right Enlargement Method
Avoid simply stretching an image - this can make it look pixelated.
Use AI-powered tools like Topaz Gigapixel AI or software like Photoshop's Preserve Details 2.0 for better results.
3. Avoid Using a Linear Stretch Method
• An image will pixelate when a single stretch method is used without relation to the original ratio.
4. Imaging Sharpening: Image clarity can be maintained by applying some sharpening effect after enlargement. Apply techniques to unblur images to enhance details and print quality.
• Method: Enhance details through unsharp masking or by applying contrast adjustments.
5. File Type Format Selection
• Stop using JPEG! The details are heavily compressed with that format.
• Best formats include PNG, TIFF, RAW
6. Take a Glance Before Printing: Use a preview function on any imaging printout software to check what the image will look like after enlargement.
7. Common Mistakes & How to Avoid Them
| Mistake | Solution |
| Using a low DPI image | Always check and adjust DPI before printing. |
| Enlarging a JPEG file | Use TIFF or PNG for better detail retention. |
| Resizing without sharpening | Apply sharpening filters (e.g., an unsharp mask). |
| Not checking print preview | Use software previews to ensure the image looks right. |
Part 3. How to Enlarge Photos for Printing
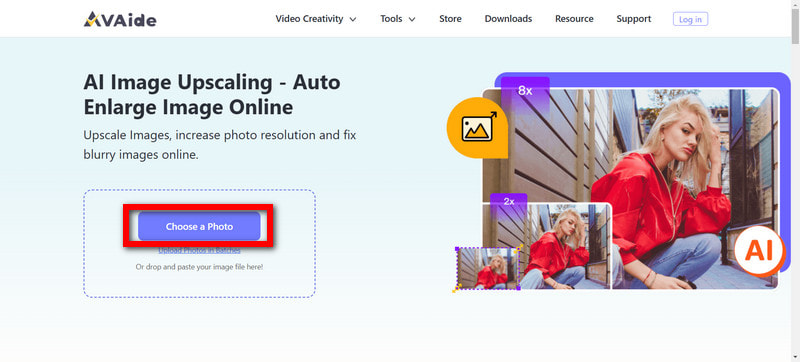
AVAide Image Upscaler is an exceptional online tool for enlarging images for printing with zero quality loss. The tool integrates the most advanced AI techniques in upscaling photos, making it excellent for photographers, designers, and casual users who require high-quality prints.
Key Features:
• Uses AI algorithms to upscale images while maintaining clarity and sharpness.
• No software installation is required - it works directly from a web browser.
• Quickly enlarges images with AI-powered enhancements.
• Intuitive and straightforward, making it easy for beginners to use.
• Compatible with PNG, JPEG, and other image file types.
Step 1Get Access to AVAide Image Upscaler
First, open your preferred web browser and navigate to the AVAide Image Upscaler website.
Step 2Upload Your Chosen Image
When the site has finished loading, click your cursor to the Choose a Photo button. A new window will open, helping you locate the file you want to upload. When you click on the desired file, it will upload automatically for further processing.
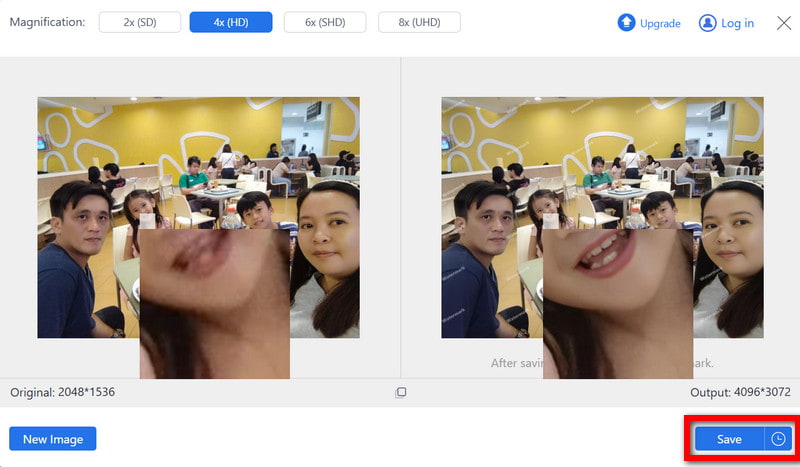
Step 3Chose the Enlargement Scale
Afterward, choose how small or big you want the files; it could be 2×, 4×, 6×, and 8×. AI technology will scan your image further, enhancing the quality and lifting details while ensuring you do not face any consequences of pixelation.
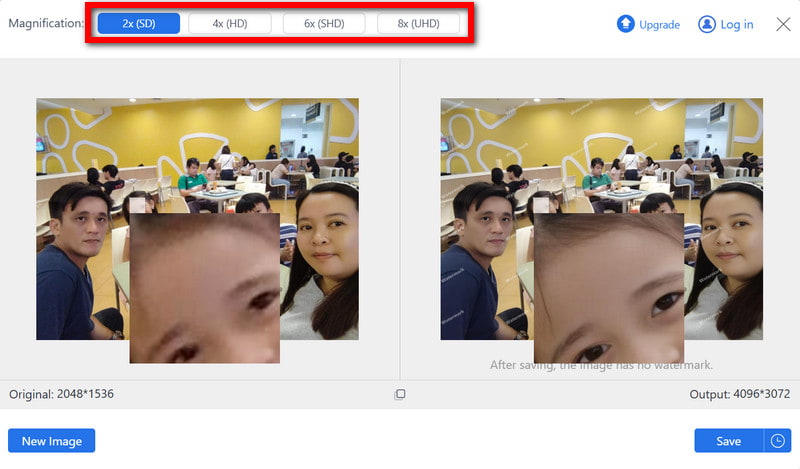
Step 4Inspect and Make Changes for Desired Results
After completing the previous steps, it is time to ensure that the final image meets your quality expectations in sharpness and clarity.
Step 5Upload the Enhanced Photograph
You can now save or download the photographed image in an altered size with the help of the Save button.
Knowing how to enlarge digital images for printing while maintaining quality to get professional results is critical. You can effectively increase the size of your images while keeping them crisp and detailed by understanding DPI and resolution and utilizing intelligent tools such as AVAide Image Upscaler that benefit from artificial intelligence. Remember to use the correct file format, preview the image on the screen before printing, and don't be afraid to sharpen it when necessary. Achieving impeccable enlarged photo prints is easy and possible with the proper techniques.

Our AI technology will automatically enhance the quality of your images, remove noise and fix blurry images online.
TRY NOW