Picture yourself getting ready to apply for a visa to travel abroad. You want to ensure your visa photo meets all the requirements. This post will help you achieve that! It will present visa photo requirements you must know to get your application approved. Do not worry if you have a problem with your visa photo's background and size. This post will also provide a solution and teach you how to edit photos for a US visa. So, ready to embark on your journey confidently, knowing your visa photo is up to par!
Part 1. Visa Photo Requirements
It is crucial to follow the visa photo requirements carefully to ensure your application is not rejected when applying for a visa. Here is a guide to help you understand what is needed for your visa photo:
1. Size
The size of the photo matters. Most visa applications require standard passport-sized photos. It is commonly 2 inches by 2 inches or about 50 millimeters by 50 millimeters in size.
2. Background
The background of your picture should be plain white or off-white. Avoid patterns, colors, or objects in the background.
3. Expression
You should have a neutral facial expression with both eyes open. Avoid smiling excessively or frowning. Keep your face relaxed and natural.
4. Head Position
Your head should be centered within the frame, facing the camera. Your head should not be tilted up, down, or to the side.
5. Face Visibility
Your entire face should be visible in the photo. There should be no shadows covering any part of it.
6. Head Coverings
If you wear a head covering, ensure your whole face can be seen. It should be visible from the bottom of your chin up to the top of your forehead.
7. Attire
Wear regular clothing for your photo. Avoid uniforms, costumes, or clothing that covers your face or creates shadows.
Part 2. How to Edit Photo for a US Visa
A free-to-use platform accessible through any web browser that can help you edit a photo for a US visa is AVAide Background Eraser.
One standout feature is its ability to change the background of your visa photo. It can help you comply with the color background requirement, which is white. Not only that, it also offers a built-in cropping option. It allows you to change the size of your photo precisely. You can manually resize your photo or choose the preset sizes provided. These sizes include 1 inch, 2 inches, 3 inches, and 4 inches, etc. Indeed, AVAide Background Eraser makes editing your visa photo hassle-free.
Below are the steps on how to edit a photo for a US visa using AVAide Background Eraser:
Step 1Visit the AVAide Background Eraser's official website using your web browser.
Step 2Click the Choose a Photo button. It will automatically open your local folder. Import the US visa photo you desire to edit using the platform.
Step 3The platform will process your image. It will immediately remove the background of your photo. The background will become transparent. Then, it will keep the main subject highlighted in color red.

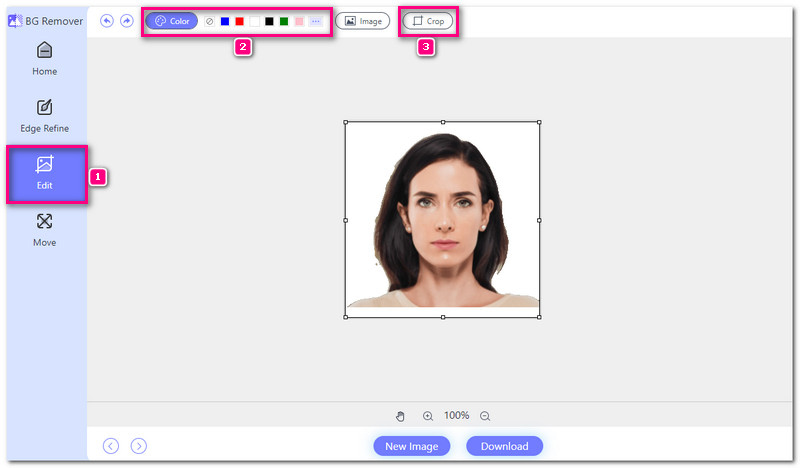
Step 4Head to the Edit tab from the main menu. Here, you can change the background and crop unnecessary parts of your photo.
Select the White under the Color option. It is the color background requirement for your visa photo.
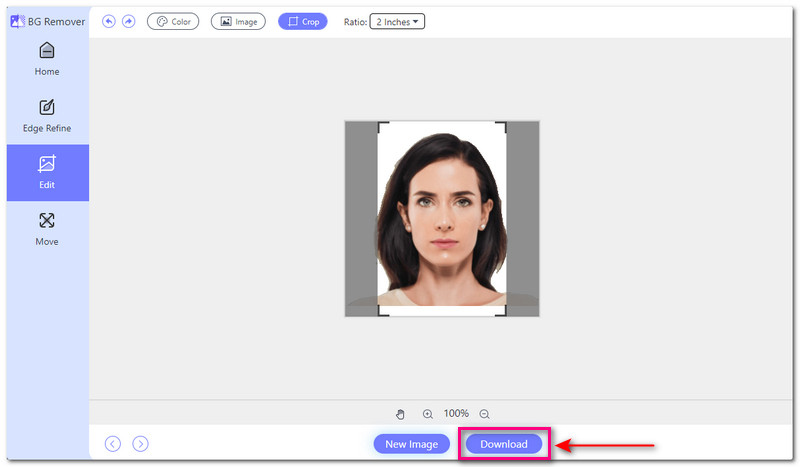
Move to the Crop option. You can manually crop a picture for a US visa by dragging one of the edges. You can also choose from the specific size in the Ratio drop-down menu.
Step 5Hit the Download button once you are satisfied with the changes. You can check your edited visa photo on your local file.
Part 3. Bonus: How to Take a Visa Photo at Home
Have you ever wondered how to take a visa photo without leaving home? This section will provide an answer to that. You can capture a professional-looking photo right in your space. Let us explore how to take a visa photo at home, ensuring it meets all the requirements for your application.
Step 1Choose a well-lit area with natural light. Avoid harsh shadows on your face. Use a plain white or off-white wall as your background. Ensure there are no objects or patterns behind you.
Step 2Set up your camera or smartphone on a stable surface. Ensure it is at eye level and facing you. Position yourself so your head and shoulders are in the frame. Leave some space above your head and on the sides.
Step 3Face straight at the camera with a neutral expression. Keep your face relaxed, and avoid tilting your head. Take several photos to ensure you have options to choose from. Check each photo to ensure your face is clear and visible.
Note: Remove accessories like hats, sunglasses, or headbands covering your face.
Step 4Review the specific requirements for visa photos of the country you are applying to. Ensure that your photo meets their size, background, and other specifications.
Step 5Use photo editing programs or applications to crop and resize your photo. Ensure it still meets the requirements after editing.
Part 4. FAQs about Editing Photos for Visa
Where to take a visa photo?
You can take your visa photo at a local photo shop or online. Photos from photo shops are of better quality and clearer. It reduces the chance of your application being rejected because of poor-quality photos.
How do you take a photo for a US visa?
Your photo must clearly show your whole face right in the center of the picture. Side views or blurry photos would not work. The background should be plain white or off-white. Look straight at the camera with a neutral face and both eyes open.
Which app can I use to edit visas?
You can use Passport Photo Maker (ID Photo Maker Studio) on Android devices to do your task. It is one of the best passport-size editor applications among free passport photo makers, editors, and photo prints.
What are the Japan visa photo requirements for size?
The standard size is 45 millimeters (height) by 35 millimeters (width). This size ensures your photo fits the standard dimensions required for Japan visa applications.
Can I use filters or special effects in my visa application photo?
No! It is necessary to avoid using filters or special effects that alter your appearance. The visa authorities require an accurate representation of your facial features for identification.
There you go! You have learned the US visa photo requirements, which will help you improve your application. Knowing these rules boosts your chances of getting your visa approved. Plus, you have learned how to edit your photos for a US visa, thanks to AVAide Background Eraser. This platform makes editing easy! So, whether planning a trip, studying abroad, or looking for work, remember: your visa photo's details count!

Uses AI and automated background removal technology to capture complex backgrounds from JPG, JPEG, PNG, and GIF.
PROCESS NOW