Pixel is the smallest unit of information in a photo. These are like small dots or squares that form the entire photo. A digital image will appear pixelated or blurry significantly when enlarged if it only contains fewer pixels.
If your photo is in the same situation, you may need to add more pixels. This post will present various solutions to add pixels to photos. We will illustrate 6 free and easy-to-use online, on computer, and phone.
- Part 1. What Does it Mean to Add Pixels to a Photo
- Part 2. The Best Way to Add Pixels to Photos Online for Free
- Part 3. How to Add Pixels to Photo in Photoshop
- Part 4. How to Add Pixels to Photo on GIMP
- Part 5. How to Add Pixels to Photo on Preview
- Part 6. How to Add Pixels to a Photo on iPhone/Android
Part 1. What Does it Mean to Add Pixels to a Photo
Adding more pixels to a photo will increase the size or resolution. This process enhances the clarity, detail, and sharpness of the photo. It makes the photo bigger in height and width and improves the quality and appearance. It is commonly done for digital media, graphic design, and printing.
Part 2. The Best Way to Add Pixels to Photos Online for Free
The first method we recommend to add pixels to photos is using AVAide Image Upscaler because it is free and easy to use and accessible on various web browsers. This platform is outstanding in upscaling photo resolution and enhancing clarity, detail, and sharpness. The subject on your image will be more distinguishable and clearer.
But here is the impressive part: it offers a built-in magnification option. This feature offers various enlargement levels. These include 2×, 4×, 6×, and 8×. These enlargement levels allow you to add more pixels to your photo and convert image to 4K. It will increase the pixel dimension of your photo and, at the same time, make your photo more detailed and sharper.
Step 1Visit the official website of AVAide Image Upscaler using your web browser.
Step 2Click the Choose a Photo button to import the photo you want to add more pixels.
Step 3You can see the original photo on the left and the upscaled photos on the right. Now, head to the lower corner of the display. You will see the original pixel dimension and output pixel dimension of the photo. As you notice, the output pixel dimension has increased.
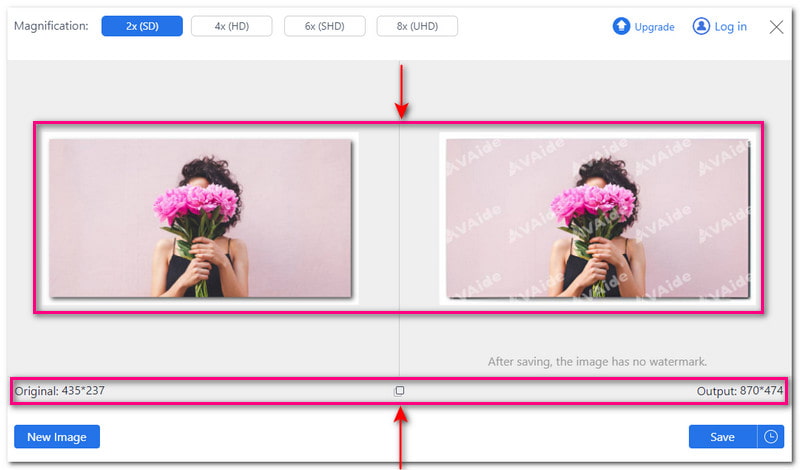
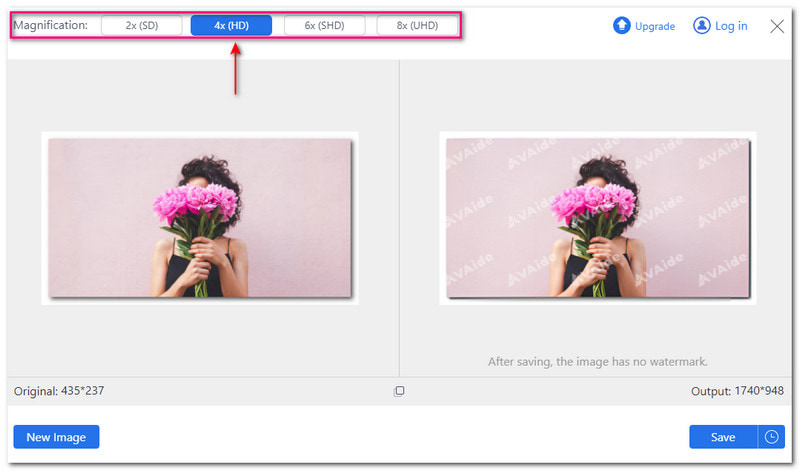
Step 4Head to the Magnification option. Please select from 2×, 4×, 6×, and 8× to enlarge your photo even more. The output pixel dimension will be increased the higher the enlargement level you select.
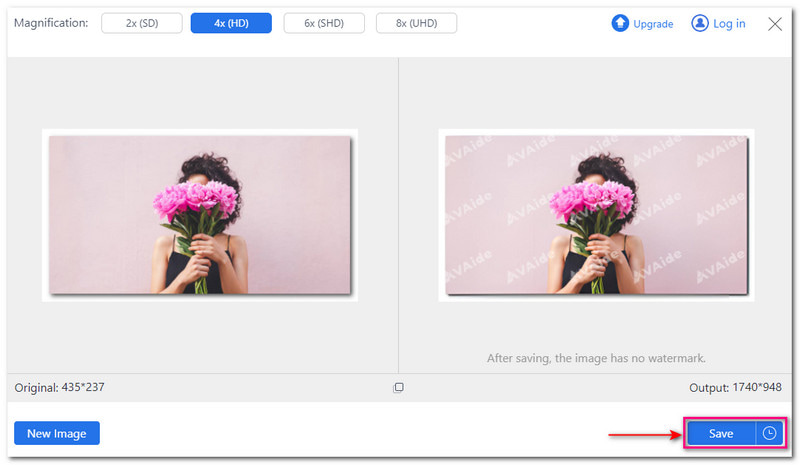
Step 5Once satisfied, click the Save the button to download your watermark-free edited photo to your local folder.
Part 3. How to Add Pixels to Photo in Photoshop
A powerful photo editing program used by photographers, artists, and designers to edit and enhance images is Photoshop. Beyond editing, it can also help you add more pixels to your photos. It has a built-in image resizer that allows you to see the original pixels and change them according to your liking. It can transform your small or pixelated photo into a clearer and larger one without losing quality.
Below are the steps on how to add pixels to a photo in Photoshop:
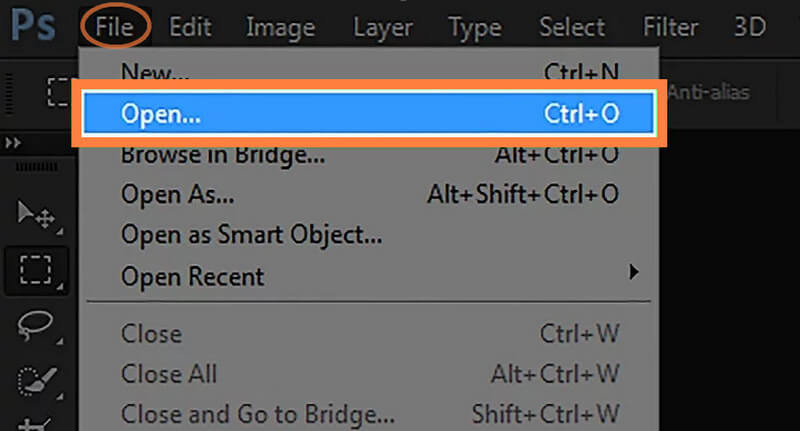
Step 1First, open the photo from the program: click File > Open.
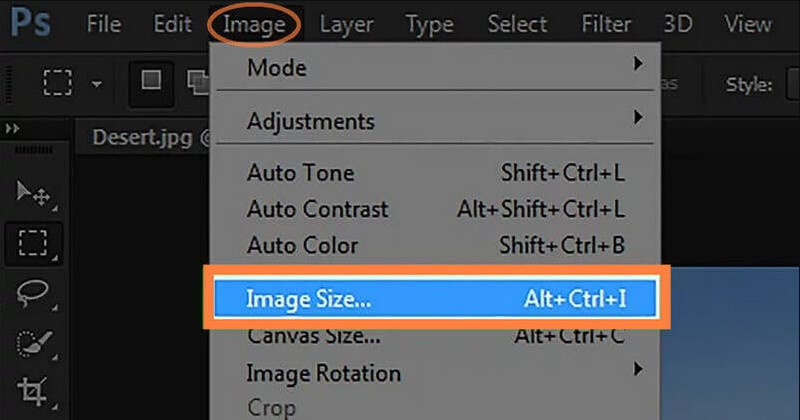
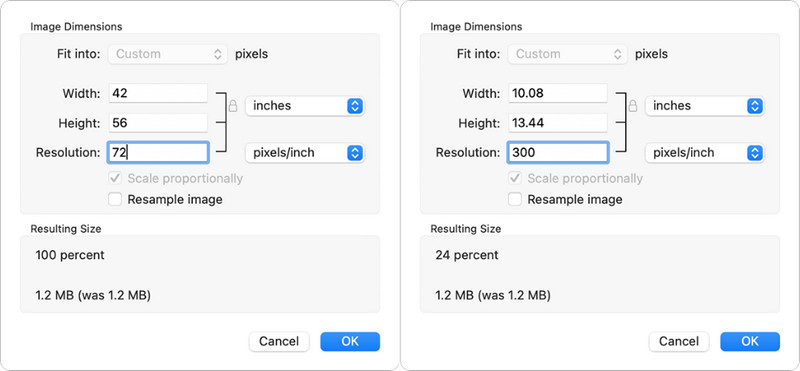
Step 2Go to the Image menu and pick Image Size. The dialog display will show up on the screen.
Step 3You will see a box with an arrow shape inside beside the dimension; click it. Once enabled, it displays the photo's current dimension in pixels.
Step 4Head to the Resolution text box. Enter a large number to increase the number of pixels per inch.
- Put a checkmark beside the Resample if there is not already one.
Step 5Finally, press the OK button to resample the photo and increase the pixel count.
Part 4. How to Add Pixels to Photo on GIMP
GIMP, short of GNU Image Manipulation Program, is a cross-platform image editor. It is compatible with Linux, macOS, Windows, and more. More importantly, it is free and open source. As a free alternative to Photoshop, it can add pixels to photos and upscale them effectively.
Let's see how to add pixels to photos using GIMP.
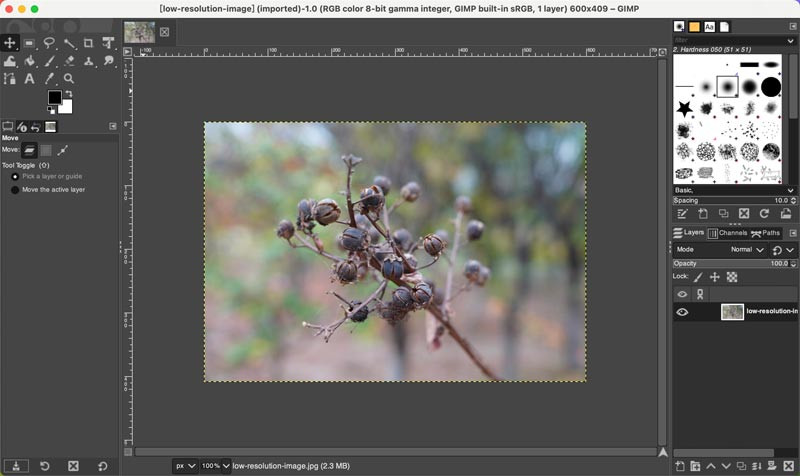
Step 1Download GIMP from its official website and open the low pixel photo into it.
Step 2Select Image > Scale Image. Specify Width and Height according to your needs. Next to the Interpolation, you can choose Lanczos for moderate upscaling, or Sinc (best quality) for the highest quality but slowest processing. Finally, click Scale.
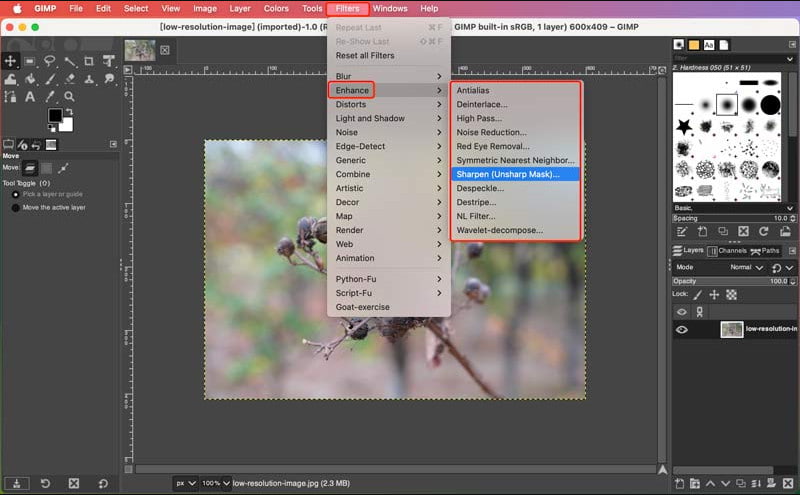
Step 3After upscaling an image, you can use a gentle sharpening filter to enhance the image details. Go to Filters > Enhance > Sharpen. The feature will reduce noise and smooth the subject.
Part 5. How to Add Pixels to Photo on Preview
Preview is the built-in program on your Mac computer. It processes documents and images effectively on your Mac computer for free. In this part, we will tell you how to ass pixels to photos using Preview.
Step 1Go to the Preview app on your Mac and open an image.
Step 2Click the Tool button on the top and choose Adjust Size.
Step 3Set a larger Resolution, and then click OK.
Part 6. How to Add Pixels to a Photo on iPhone/Android
1. Image Resizer
As its name indicates, Image Resizer is a mobile application capable of adding pixels to your photos. It provides various pre-sets of resolutions. These include 1024 × 768, 800 × 600, and 640 × 480. Another thing is that it enables you to enter your preferred height and width using the custom size option. This feature can help you add pixels to your photos based on your needs or requirements.
Step 1Run the application to get started.
Step 2You will see three options on the interface. These options are Select a Photo, Take a Photo, and File mode.
Step 3The application provides various options to add pixels to your photos. These are 1024 × 768, 800 × 600, Custom size, and Crop photo. If you want to customize the pixels of your photo, please select the Custom size option.
Step 4Please enter the Height and Width depending on your requirements. Selecting a higher number to add more pixels to your photo would be better.
Step 5When settled, click the OK button to save the changes.
2. Picwand
Picwand is one of the known mobile applications capable of upscaling images. It employs artificial intelligence technology to upscale various kinds of photos. You can upscale your low-resolution or high-resolution photos to high-definition and ultra-high-definition. This application has a built-in magnification option. This feature can help you enlarge your photo and increase the photo pixels. However, it is a paid application. You must subscribe to the paid version to access all the enlargement levels.
Here is how to add pixels to a photo on an iPhone using Picwand:
Step 1Install Picwand using your mobile device.
Step 2Click the (+) button in the center of the interface. Please import the photo you desire to increase the photo pixels.
Step 3You will see a magnification option on the center-lower of the interface. These magnification levels are 2×, 4×, 6×, and 8×. From these enlargement levels, select one you prefer.
Step 4Hit the Upscale button once selected. It will upscale and enlarge your photo, depending on your selection.
Step 5Once done, press the Save Now button to save your edited photo on your phone gallery.
Can you add pixels to a photo? The answer is yes! This write-up proves that it is possible to add pixels to your photos. We have provided various methods you can count on, whether online, offline, or using mobile devices.
If you want a reliable and easy way to add pixels to your photo, you can have AVAide Image Upscaler. It employs artificial intelligence technology to do all the processes for you. It is perfect if you want to avoid manually adding pixels to your photos!

Our AI technology will automatically enhance the quality of your images, remove noise and fix blurry images online.
TRY NOW