Du kan dele en video, men innser å ha undertekster for inkludering og engasjement ville være mye bedre. Å vite hvordan legge til undertekster til en video øker klarhet og rekkevidde. For denne guiden vil vi bruke AVAide, Premiere Pro og nettbaserte verktøy som Clideo, VEED.IO og Happy Scribe for sømløst å legge til undertekster.
Del 1. Den enkleste måten å legge til undertekster på video på Windows og Mac
En av de mest enkle og effektive måtene å lage undertekster og inkludere dem i videoene dine er AVAide Video Converter. Den har en enkel design og et bredt spekter av redigeringsmuligheter, noe som gjør denne programvaren til en av favorittene til Windows- og Mac-brukere. Det hjelper deg enkelt å legge til, endre og synkronisere transkripsjon uten å miste denne programvarens kvalitet.
- Du kan raskt legge til hvilken som helst undertekst til en hvilken som helst video, og SRT-, ASS- eller SSA-undertekstfiler kan importeres, redigeres og justeres med videoen.
- Redigering eller tillegging av undertekster vil ikke påvirke videokvaliteten til det endelige klippet (opptil 8K).
- Fungerer med Mac og Windows.
- Innebygd trimmer for å kutte ned, rotere, beskjære, modifisere eller snu videoer.
Trinn 1Last ned AVAide Video Converter fra det offisielle nettstedet og installer det på Windows eller Mac.
Steg 2Start programmet og trykk på Legg til filer for å importere videofilen med undertekster lagt til.
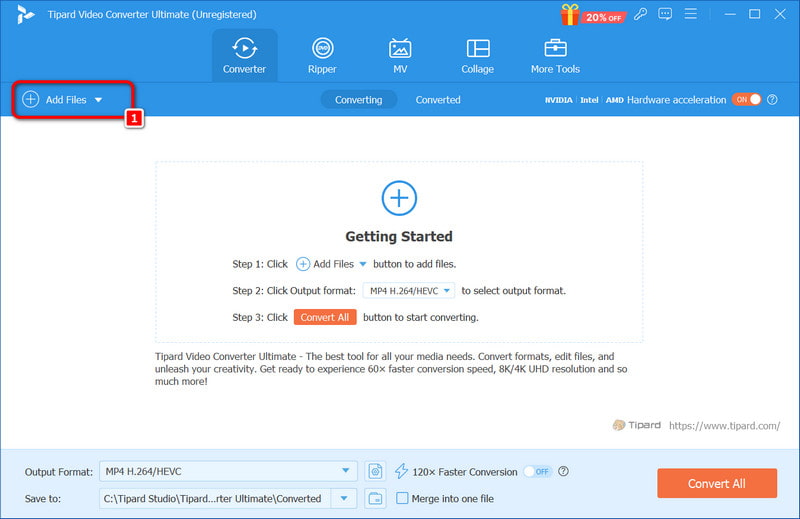
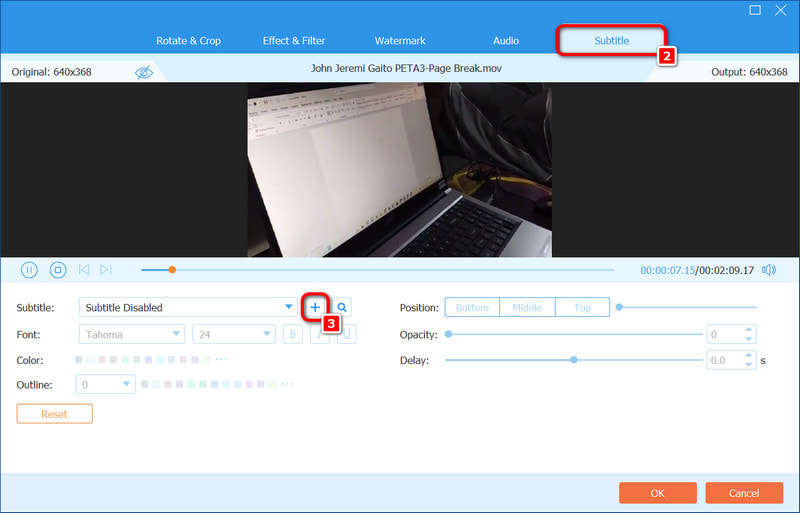
Trinn 3Velg videoen og klikk på Redigere knappen, som ser ut som en tryllestav. Velg deretter Undertekst fanen i verktøylinjen og trykk på + for å plassere undertekstfilen (SRT, SSA eller ASS) i prosjektet.
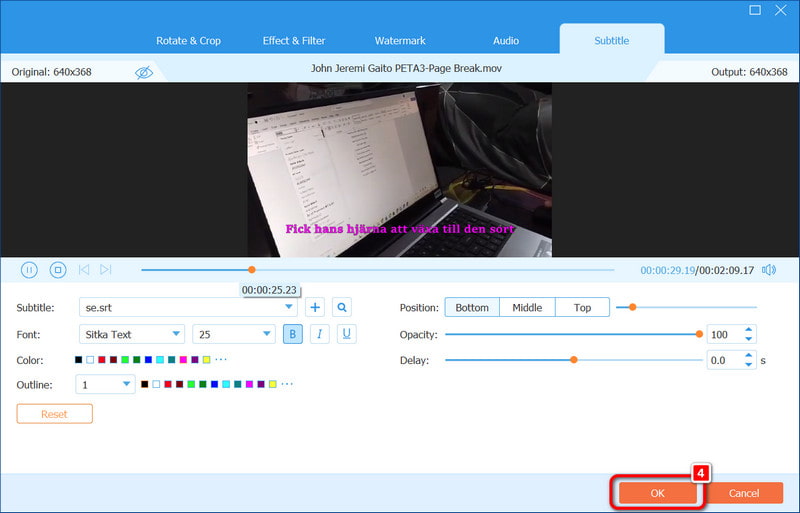
Trinn 4Om nødvendig, endre undertekstinnstillingene som font, størrelse og farge og klikk OK. Til slutt velger du ønsket utdataformat og trykker Konverter alle for å eksportere videofilen med undertekstene lagt til.
Del 2. Hvordan legge til undertekster i Premiere Pro enkelt
Ved å bruke Adobe Premiere Pro er det enkelt å inkludere undertekster i videoene dine, noe som fremmer inkludering. Dessverre har det vært et lavt opptak av undertekster hvis man ønsker å øke interessen og nå en ny demografi. I denne delen tar import av videoen din, hvoretter du oppretter og justerer og inkluderer bildetekster for ethvert format, bare minutter av tiden din.
Trinn 1Trekk MP4-, AVI-, MOV- eller annen passende videofil inn i Premiere Pro-tidslinjen. Hvis det valgte formatet ikke støttes, vennligst konverter formatet først.
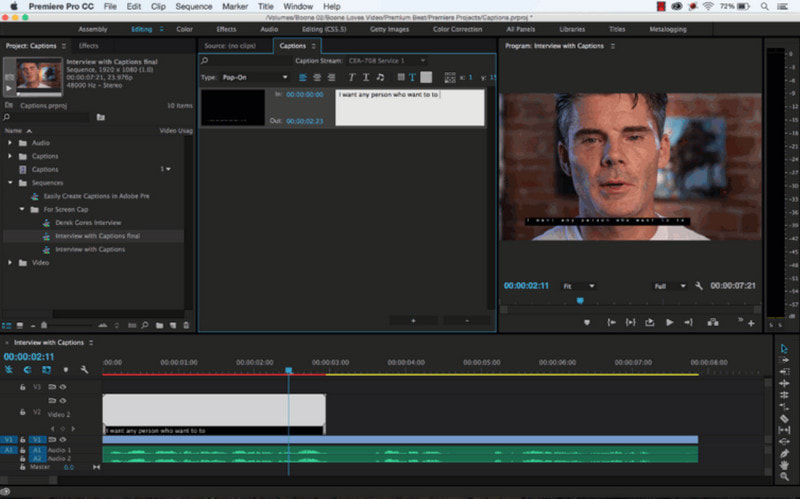
Steg 2For å åpne Tekst panel hvor du skal jobbe med undertekstene, gå til Vindu > Arbeidsområder > Bildetekster seksjon.
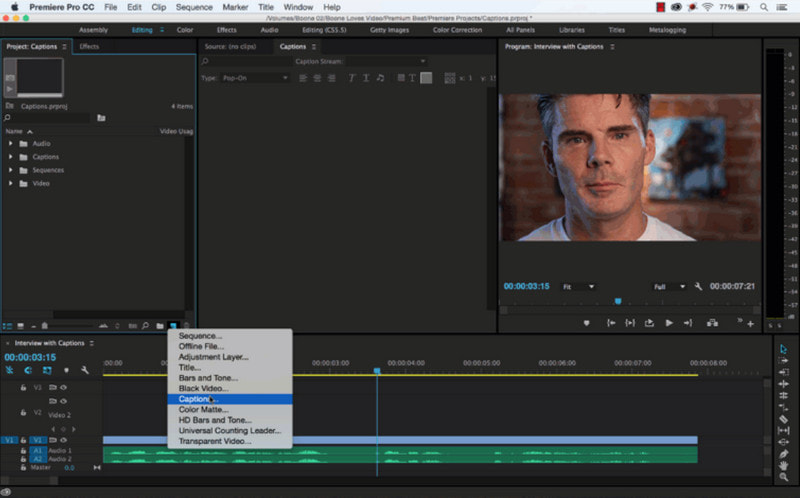
Trinn 3Klikk Opprett nytt bildetekstspor i tekstpanelet og velg Undertekster alternativ. Dette gjør det mulig å enten kode bildetekster i videoen eller lagre dem separat.
Trinn 4Flytt spillehodet til punktet der du ønsker å starte underteksten, klikk på + knappen på Tekst panel, og skriv inn ordene du ønsker å bli sagt opp
Trinn 5Bruk glidebryterne i bildetekstsporet for å få ordene til å passe riktig til lyden og forbedre grafikken ved å bruke Essensiell grafikk panel. Endre skriftstørrelse, plassering og farge i henhold til videoutseendet ditt.
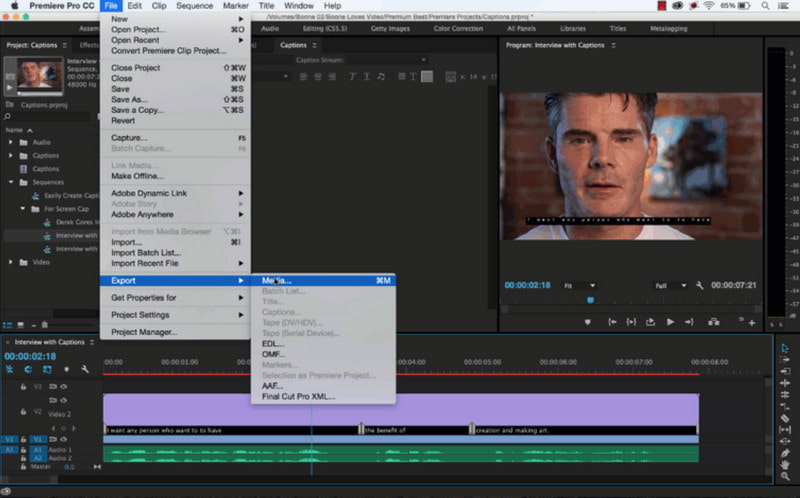
Trinn 6Gå til Fil > Eksport > Media, deretter under Bildetekst fanen, velg om du vil Brenn bildetekster inn i video eller Lag en sidevognfil for å tillate å slå dem på eller av. Dette gir deg fleksibilitet for ulike plattformer.
Del 3. Hvordan legge til undertekster til en video på nettet
Når du legger til undertekster til videoer, er det en god tilnærming for å maksimere publikums involvering og gjøre det mulig for et større publikum å få tilgang til innholdet. I begge tilfeller, enten det er å laste opp sosiale medier-videoer eller profesjonelt videoinnhold, hjelper teksting med forståelse og engasjement. Clideo, VEED og Happy Scribe er tre nettverktøy som lover å legge til undertekster til videoer raskt.
1. Clideo
Clideo er en brukervennlig nettapplikasjon som hjelper deg å legge til undertekster til videoer uten komplikasjoner. I tilfelle du trenger selen for å komme med SRT-filer, har Clideo et enkelt grensesnitt som gjør dette og mange andre endringer raskt og enkelt.
- Fordeler
- Ingen installasjon er nødvendig.
- Undertekststiler og fonter kan endres.
- Kan integreres med skylagringstjenester: Google Disk og bilder.
- Videoopplastinger er i flere formater, dvs. MP4, MKV og MOV.
- Ulemper
- Gratisversjonen har en opplastingsgrense på 500 MB per fil.
- De fleste funksjonene er begrenset til gratisversjonen.
- Noen funksjoner kan være mer grunnleggende.
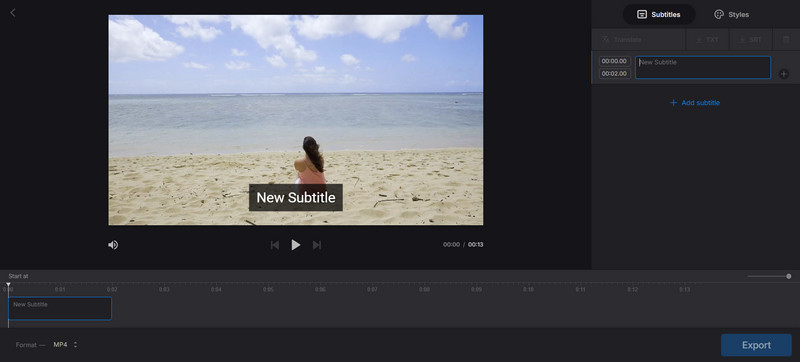
Trinn 1Gå til undertekstverktøyet til Clideo og klikk på Velg Fil for å laste opp en video du vil.
Steg 2Du kan skrive inn undertekster eller laste opp en SRT-fil hvis du har en. Endre tekst, farge, størrelse og plassering av undertekstene.
Trinn 3Åpne filmen ved å inkludere undertekstene i videoen, og foreta deretter endringer i timingen og presentasjonen om nødvendig.
Trinn 4Når du er fornøyd, klikk Eksport og nedlasting videoen med de innebygde undertekstene.
2. VEED.IO
VEED.IO er en online videoredigeringsplattform med omfattende funksjoner for å administrere undertekster. Den største fordelen ligger i den automatiske genereringen av undertekster, noe som sparer tid og øker nøyaktigheten. Det passer for brukere som ønsker å bruke en applikasjon som gir raske utfall angående redigering.
- Fordeler
- Den automatiske genereringen av undertekster er veldig nøyaktig og effektiv.
- Flere undertekststiler (farge, animasjon og skriftstil) kan opprettes.
- Programmet hjelper også med å lage undertekster i SRT-, VTT- og TXT-formater.
- Tillater oversettelse av tekst og legger til støtte for flere språk gjøre videoen lysere.
- Ulemper
- Noen funksjoner, som eksport av undertekster og oversettelse, er begrenset til premiumbrukere.
- Gratisversjonen kan ha en bedre eksportkvalitet.
- Denne versjonen inneholder et vannmerke.
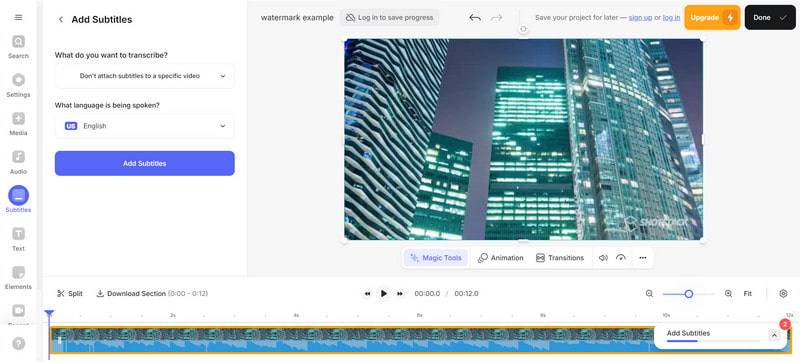
Trinn 1Gå til VEED.io-hjemmesiden og klikk på Kom i gang for å opprette kontoen din. Du kan laste opp videoer fra enheten din eller sette inn en URL.
Steg 2Bruke Auto undertekst funksjon for automatisk å lage undertekster eller laste opp SRT-filen din.
Trinn 3Legg til bildetekster til videoene dine ved å endre bildetekststiler som skrifttype, størrelse, farge og animasjonseffektene på tekstlinjene eller ordene.
Trinn 4Etter å ha implementert undertekstene, kan du lagre klippet med hardkodede undertekster eller eksportere SRT-filen som inneholder undertekstene separat.
3. Glad skribent
Happy Scribe er et profesjonelt verktøy som brukes til transkripsjonstjenester og for å lage profesjonelle undertekster for lydfiler og videoklipp. Det lar brukere produsere raske og effektive manuelle og automatiske undertekster, noe som er nyttig for folk som raskt og enkelt vil legge til undertekster til videoene sine.
- Fordeler
- Gir funksjon for automatisk teksting av video
- Tilbyr svært høy nøyaktighet i transkripsjon
- Det er en enkel måte å bruke undertekster på i videoen.
- Støtter forskjellige formater av videofiler.
- Ulemper
- Minimum antall tilgjengelige tekstingsvalg.
- Det kan ta tid før brukeren legger de automatiske undertekstene
- Det er ingen funksjoner som er gratis i nesten alle nivåer.
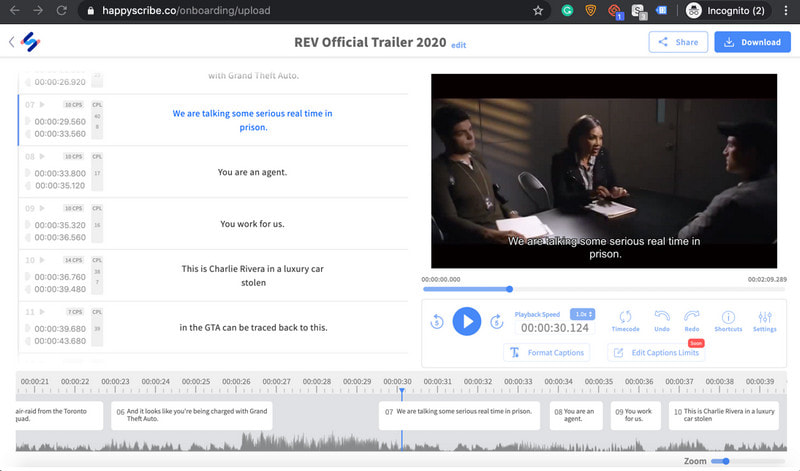
Trinn 1Gå til Happy Scribe og klikk Velg Fil for å laste opp videoen din i formater som MP4, AVI, MOV
Steg 2Klikk deretter Last opp undertekst og legg til en ny undertekstfil.
Trinn 3Etter ordrett generering av oversettelse, må brukeren gå gjennom undertekstene som er opprettet og justere eventuell upassende timingplassering og feileliminering under transkripsjonen.
Trinn 4Når resultatene er perfekte, eksporter du videoen med de innebygde undertekstene eller bare undertekstfilen.
Med denne artikkelen i hånden vet du nå hvordan legge til undertekster til video ved hjelp av appen AVAide Video Converter, Premiere Pro og nettjenester. Disse metodene er ganske fleksible og enkle å bruke, noe som gjør videoene dine mer interessante, praktiske og lettere å forstå for enhver seer.
Din komplette videoverktøykasse som støtter 350+ formater for konvertering i tapsfri kvalitet.


 Sikker nedlasting


