What is a watermark? Now, that is not just an average question. It is one of the most important features in every piece of content. In this guide, we will start from the basics and understand what a watermark is, the varieties of watermarks available, how to add them to a video or image, and how to remove watermarks using advanced software like AVAide.
Part 1. Types of Watermarks
• Photo Watermark: Photo Watermarks are primarily used to shield against copyright infringement and the recognition of the owner by using a semi-opaque word, image, or graphic that one overlays on the particular image. A watermark is an often-used term in stock photographs or professional portfolios. Watermarks on the photo may have the text or an image form.
• Video Watermark: A video watermark is a form of copyrighting that serves as a photo watermark but is placed on videos. In most cases, it is fixed in one of the corners of the video for the entire length of the clip or periodically to keep the content safe and create the identity of the owner. YouTube and Vimeo are among some web services that restrain piracy and encourage brand recognition through video watermarks.
Part 2. Ways to Create Watermarks for Videos and Images
There are different ways of creating watermarks depending on the type of content and the tools at hand. Those include:
1. Using Video Editing Software: Several video editing computer applications allow the user to edit videos by incorporating their video watermarks. Text, logos, and image overlays can also be incorporated to act as watermarks over the content to prevent its misuse.
2. Using Image Editing Software: Other ordering applications also allow the creation of watermarks on images. The details of the photos may include textual or graphical representations such as watermarks, which protect the ownership of the image.
3. Online Tools: There are websites that enable users to make and place watermarks over videos and images online. Such tools are non-complex and can be comfortably used without installing any packages.
4. Mobile Apps: Other than that, various applications allow users to create and attach watermarks on videos on their mobile devices. It is a handy option as users can skip a lengthy procedure to access it.
Part 3. Examples of Watermarks
| Type of Watermark | Video | Image |
| Text Watermark | A semi-transparent text like © 2025 YourBrand placed in the bottom-right corner of a video. | A subtle, diagonal text watermark that reads Sample across the image to prevent unauthorized use. |
| Logo Watermark | A small, transparent company logo placed consistently in one corner of the video throughout its duration. | A slightly transparent company logo centered on an image, ensuring brand recognition while not obstructing the main content. |
| Pattern Watermark | A repeating pattern of a logo or brand name faintly overlaid across the entire video frame, making it difficult to remove. | A grid-like pattern of the brand initials is applied across the whole image to deter unauthorized use while keeping the content visible. |
| Signature Watermark | A digital signature of the creator is added as a watermark in the corner of the video, adding a personal touch. | A digital signature of the artist in the corner of an artwork or photograph to denote authorship. |
| Date and Time Watermark | The date and time of recording stamped on the video, useful for documentation or legal purposes. | A small date and time stamp on the bottom of a photo is commonly used in surveillance images. |
Part 4. Tools for Adding Watermarks
1. AVAide Video Converter
AVAide Video Converter is an outstanding media converter that contains various utilities, such as adding watermarks to videos and images. If you need to add a text or logo watermark to your content to protect it, AVAide makes it easy with its simple interface and effective tools. It even contains a watermark remover to help you remove the watermark from a video.
Step 1First, download and install the AVAide Video Converter on your device.

TRY IT FREE For Windows 7 or later
 Secure Download
TRY IT FREE For Mac OS X 10.13 or later
 Secure Download
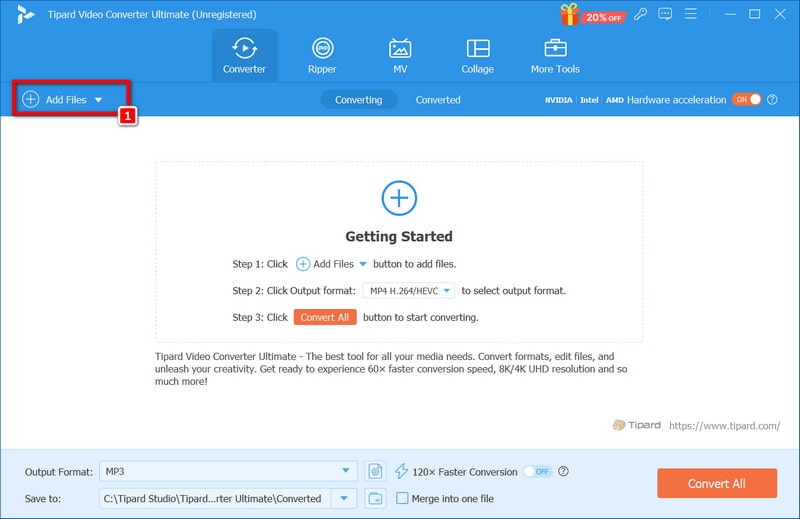
Step 2After this, click the Add Files button and proceed to upload the video or image to which you wish to add a watermark.
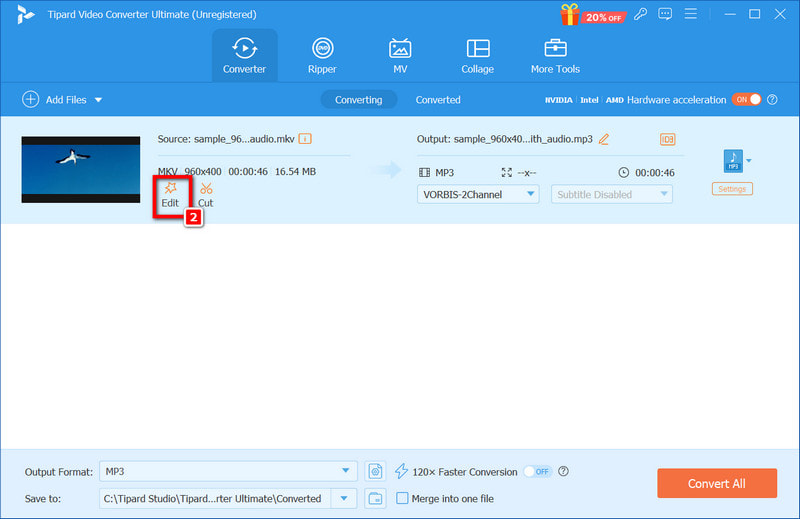
Step 3After uploading your file, access the editing tools by clicking on the Edit button, which is shaped like a magic wand.
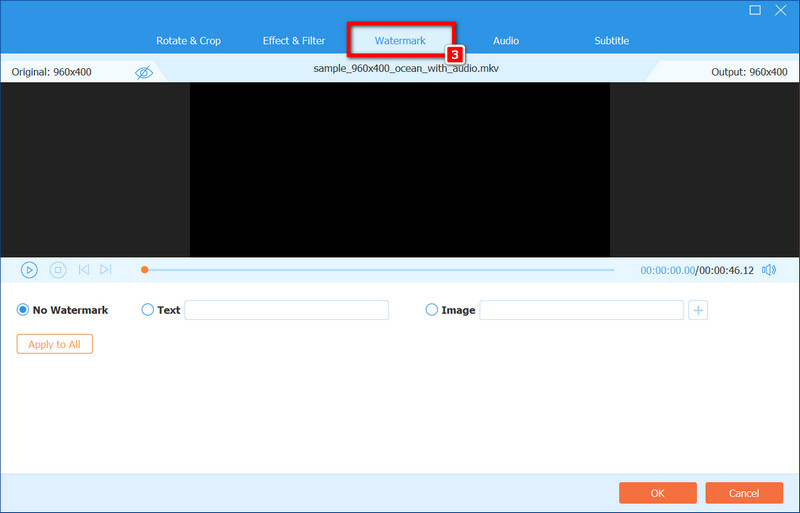
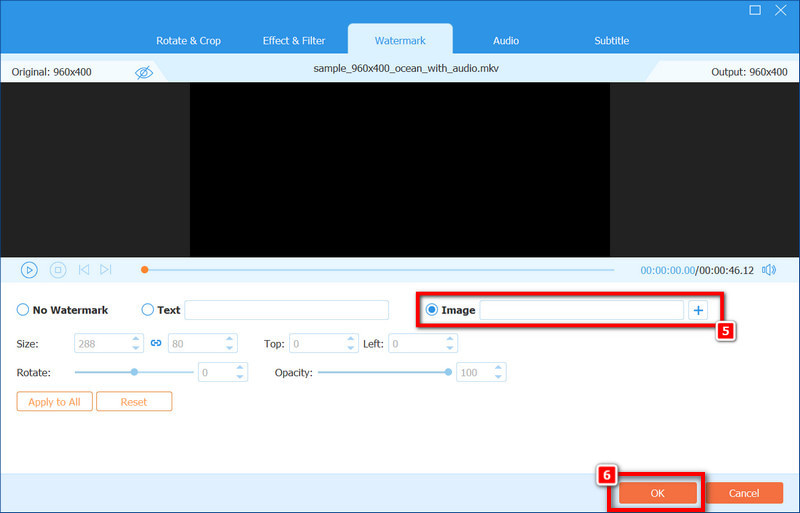
Step 4Now, in the menu, transition to the Watermark section. Here, you decide what kind of watermark, if any, you wish to add text or image.
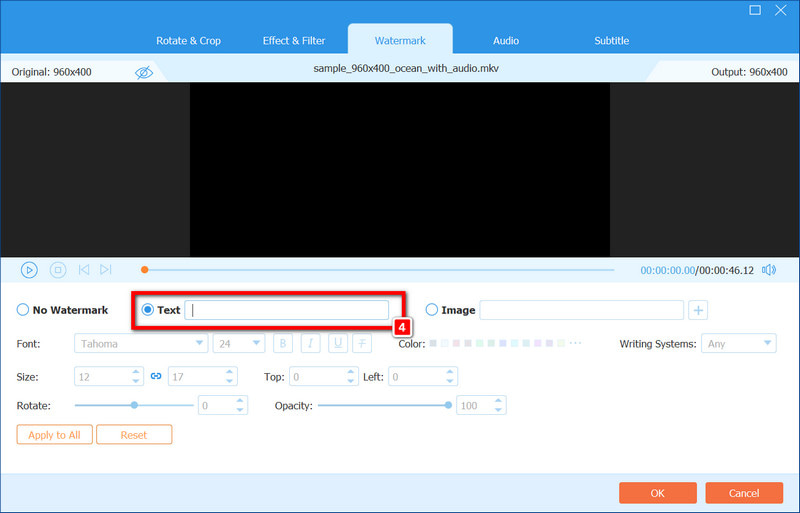
Step 5For a text watermark, the desired text is entered and adjusted to the font type, size, transparency and position. When an image is uploaded, you can further customize it regarding the position and transparency.
Step 6Having set the watermark over the video or image, check the preview to see if it is in line with your designed expectations. After which, click OK once the watermark has been added.
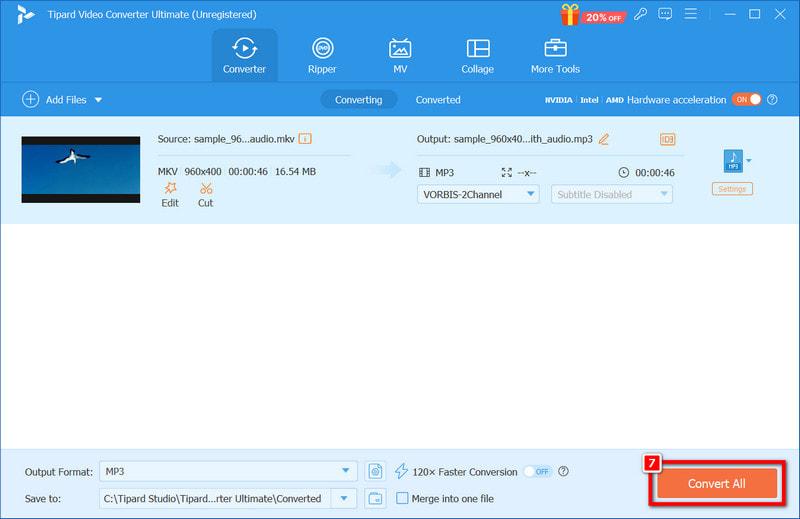
Step 7Last but not least, click on the Convert All button in order to save the edited video or image with the watermark in the required format to the specified location.
2. Adobe Premiere Pro
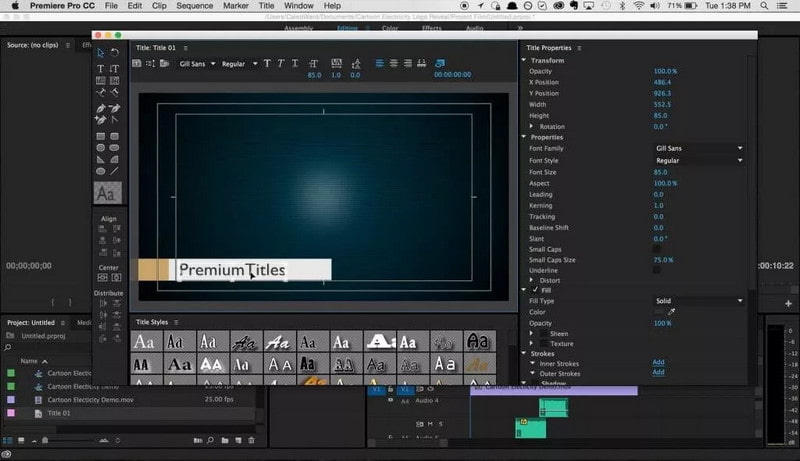
Adobe Premiere Pro has a number of features that provide adequate control of a watermark on a video, editing picture backgrounds and more. Outlined below is the process of incorporating a watermark into a video within the Adobe Premiere Pro application using seven steps.
Step 1Launch Adobe Premiere Pro and open a project for which you will add a watermark.
Step 2Switch to the Project panel. Right-click within the panel and select Import, or use the keyboard shortcut Ctrl + I (in Windows) or Cmd + I (in Mac) to import the watermark image.
Step 3Grab the imported watermark image from the project panel and drop it into the timeline. It should be positioned on a video track higher than the main video track where other images have been laid, for example, Video Track 2 above Video Track 1.
Step 4Choose the watermark clip within the timeline. Then select the Effect Controls panel (if it is hidden, look under Window>Effect Controls). The Motion settings can be used to reposition the watermark clip and size it to your bubbles.
Step 5Determine the duration of the watermark by dragging its clip end in the timeline.
Step 6When you are happy with the appearance of the watermark and where it is on your video, click on File, then Export, followed by Media. Select the desired settings for that export and press Export, which will allow you to process your video with the watermark.
Bonus: How to Remove Watermark From a Photo
AVAide Watermark Remover is an excellent photo editing application designed to remove the watermark from images using AI technology. It ensures that the region where the watermark was fitted is well blended with other pixels without a boot of the image.
Step 1On your web browser, go to AVAide Watermark Remover's official website. Then, proceed to click the Choose a Photo button or drag and drop the image file onto the platform.
Step 2The most salient attribute allows for photo submission using the previously described method. Select the area of the watermark for removal using the selection tool available after uploading your photo. This edited picture has broken both laws of physics.
Step 3Now that you have removed the watermark, you can click on the Download button in the tool to export your photo. According to this image, the modified one was loaded in media storage.

This article has educated you on various techniques for handling video and image watermarks, adding image or video watermarks, and removing watermarks. Hope you have found what you need.
Your complete video toolbox that supports 350+ formats for conversion in lossless quality.
Video Enhancement
- Upscale 1080p to 4K
- Upscale 480p to 1080p
- Downscale 4K to 1080p/720p
- Downscale 1080p to 480p
- Upscale DVD to 1080p/720p
- Fix Bad Quality Video
- AI Video Upscale
- Enhance Video Quality
- Improve TikTok Video Quality
- Best Video Enhancer
- Video Enhancer App for iPhone & Android
- Best 4K Video Enhancer
- AI Upscale Video
- Clean up Video Quality
- Make Video Higher Quality
- Make a Video Brighter
- Best Blur Video App
- Fix Blurry Videos
- Improve Zoom Video Quality
- Improve GoPro Video Quality
- Improve Instagram Video Quality
- Improve Facebook Video Quality
- Improve Video Quality on Anroid & iPhone
- Improve Video Quality in Windows Movie Maker
- Improve Video Quality in Premiere
- Restore Old Video Quality
- Sharpen Video Quality
- Make Video More Clearer
- What is 8K Resolution
- 4K Resolution: Everything Your Need To Know [Explained]
- 2 Amazing Ways to Increase Video Resolution Losslessly
- Video Resolution Converter: Things to Ponder in Getting One
- The Outstanding 5K to 8K Converter You Shouldn’t Miss!
- Remove Background Noise From Video: With Three Efficient Ways
- How to Remove Grain from Video Using the 3 Remarkable Ways


