Many people are fond of recording and editing videos nowadays. Also, netizens are getting pressured on sharing high-end videos on social media apps, as well as on video streaming sites. In relation to this, many people, especially video content makers, use different hacks just to make an awesome video recording. Why is that? Because the more unique and greater the video is, the more viewers it will get. This means bloggers who get mass views on their videos reflect on how much profit they will get.
Moving forward, one of the hacks bloggers do is the rewind video effect. On the other hand, for some reason, not all know how to reverse video. Fortunately, this post will perceive the best tools that will help you do the specific task easily.
Part 1. The Best Way to Reverse a Video on Windows
For Windows utilization, the best way to reverse your video clip is through the AVAide Video Converter. Furthermore, this full-featured software exceedingly offers the best conversion together with the video and audio enhancing schemes. Aside from its capacity to reverse clips, it also has the ultimate ability to make movies, collage videos, rip DVDs, and convert files to different varieties of formats.
Moreover, the AVAide Video Converter comes with the powerful technology that helps the users do their tasks quickly and easily. There is no way for you to be disappointed, for it gives every support that a user might need when it comes to enhancing the file. So, without any further adieu, detailed steps below are given for you to be guided on how to use it to attain backward video.
Step 1Download and Install the Software
Before getting started, make sure you download and install the software on your personal computer. In doing it instantly, you may click on the download button provided below.

TRY IT FREE For Windows 7 or later
 Secure Download
TRY IT FREE For Mac OS X 10.13 or later
 Secure Download
Step 2Look for the Video Reverser
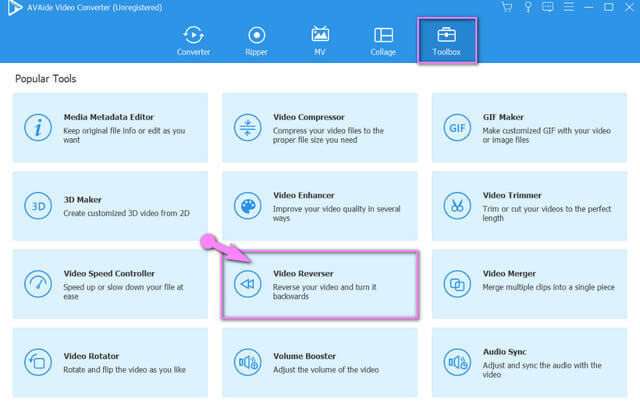
After installing, launch the software and go to the video reverser feature. Click the Toolbox, you will see tons of available tools that you can also use for other tasks. But for now, click on the Video Reverser.
Step 3Upload a Video File
Upload the video file that needs to be reverted. To do so, hit the Plus sign at the center of the interface.

Step 4Set to Reverse the Video
On the main setting interface, choose whether to set a duration time where start or end the reverse. You can do it manually or by dragging the red panel into your preferred duration.
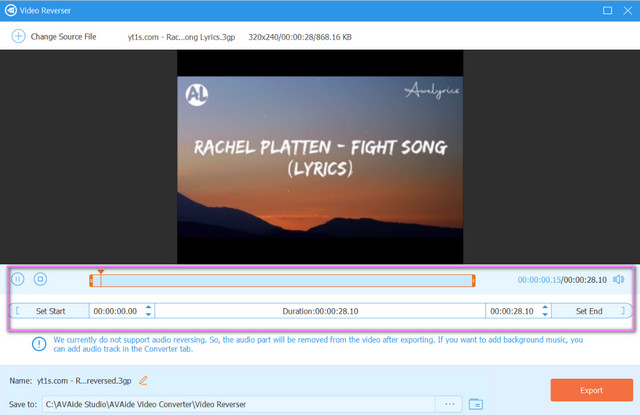
Note: Please be noted that as of this writing, audio reversing is not yet supported. Hence, supported by its other enhancers and settings.
Step 5Save the Modified Video File
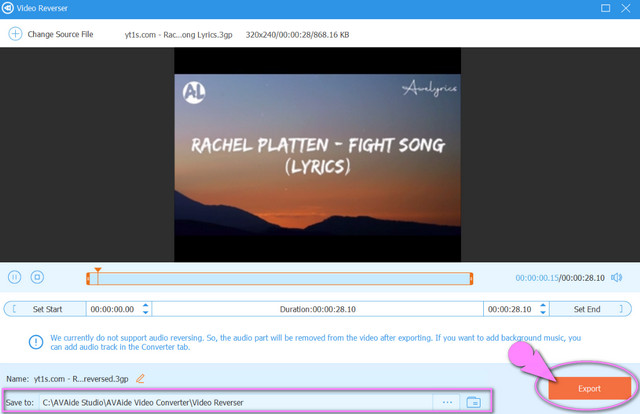
Click on the Save To portion tab, to choose a file folder where you want to save directly the reversed file. Then hit the Export red button to acquire the changes on the file. Wait for the export process to finish, then check your chosen file storage after.
- Supported by Windows, Mac, and Linux OS.
- With comprehensive support of the different variety of file formats.
- Comes with other wonderful tools besides video reverse.
- The video reverse feature doesn't support the audio reversing.
Part 2. 2 Great Methods on How to Reverse a Video on Mac
For the dedicated Apple users, we have prepared 2 of the most used tools on the Mac. These programs work best on the said device, which you will also be considering using too.
1. Reverse a Video Using the iMovie
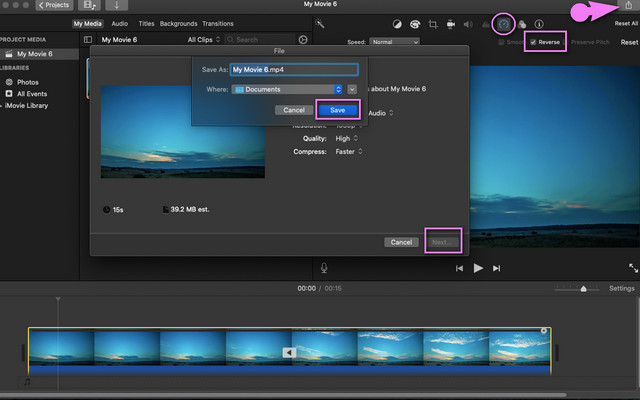
iMovie is undeniably one of the most used programs on Mac and on iOS. Furthermore, it is also an ideal video editor due to its intuitive gestures and features to obtain the high-end output. Moving forward, reversing the movie is just one of its awesome features along with the color enhancements, rotation, stabilization, noise reduction, and more. So, to cut this short, below are the simple steps on how to reverse a video using the iMovie.
Step 1Launch the downloaded iMovie on Mac. Then, click the Plus sign indicating to create a new project. Choose the Movie afterward.
Step 2Attach the video you would like to reverse by clicking the Import Media arrow at the center. Once the video is uploaded, drag it down to start creating changes.
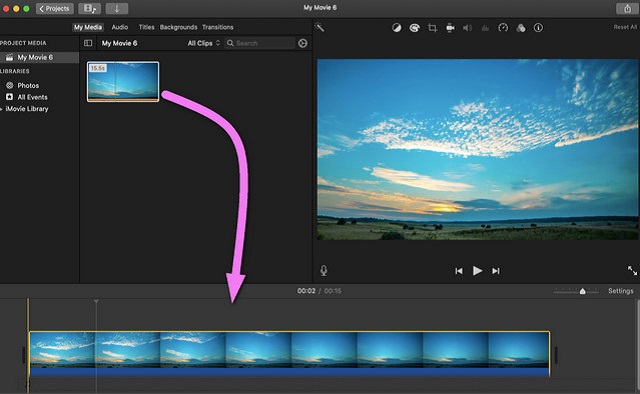
Step 3Click on the transferred video, then go to the Speed icon above the viewer. Tick on the Reverse tab, and save the file by clicking on the Share icon located at the right top-most part of the interface. Choose Export File, then click Next, rename the file, and click finally, click Save.
- Comes with multiple enhancing features.
- It offers trailers and theme features.
- The interface is not that facile that beginners might find confusing.
- It is sensitive in movement, due to its intuitive gesture.
- Some of the movies or clips that were taken from the web are blurry when transferred to iMovie.
2. The Powerful VN Video Editor
VN Video Editor is another program that suits Mac users in editing videos. Furthermore, this program has wonderful features when it comes to video clips, subtitles, special effects,s and music of the file. Moreover, just like others, it also allows you to make a movie on your own easily. However, it's not free from the watermark, so expect your output to have one when you use it. Want to know how to reverse or rewind a video with the VN Video Editor? See the guideline provided below.
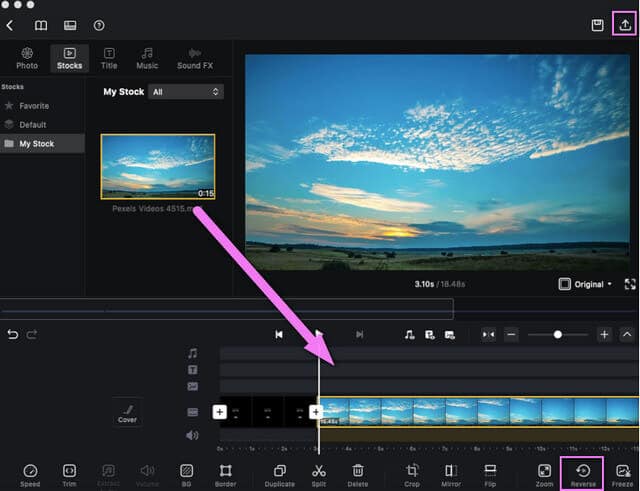
Step 1Download and install the software on your Mac safely. Launch it, then click the New Project tab.
Step 2Upload your video file by hitting the Import Stock arrow on the interface. Then, drag the uploaded file on the lower right part of the interface, to navigate modification.
Step 3Click the Reverse icon, and wait for the change process to finish. Then save the file to your device by clicking the share icon located on the right upper-most part. Click the Export button, wait for the process to finish then click Save and Done.
- With multiple editing tool choices for making projects and creation kits.
- The process and the interface are similar to the iMovie.
- The export process takes time to be completed.
- The interface becomes blurry sometimes.
Part 3. Top 2 Most Effective Online Solutions to Reverse a Video
Online solutions are what the others prefer. Regardless of being web-based, others still choose to process their task online. With this being said, we are providing below the best online programs to help you reverse movies or clips accessible.
1. Get the Know the EZGIF.com
EZGIF is an online tool that is a great choice for video reversing. Also, it is a program that contains full features for video editing such as rotate, crop, optimize, split, effects, gif maker, and more. On the other hand, below are the simple guidelines to follow in using this online solution.
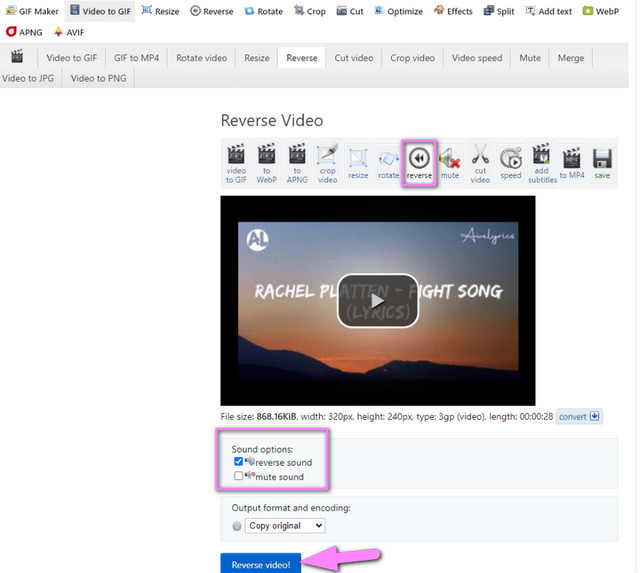
Step 1Visit its main website from your browser. Choose and click then the Reverse feature.
Step 2Hit on the Choose File tab and attach a video that you need to reverse from your device. Otherwise, paste the copied URL on the interface. Then, click the Upload Video button.
Step 3Reverse the uploaded video by clicking on the Reverse button located above the uploaded video. Don't forget to set whether to reverse or mute the sound. Finally, hit the Reverse Video to save the modified file. Wait for the process to finish, then download the completed file.
- It's web-based, no need to download software.
- With multiple editing features.
- The process of uploading files sometimes crashes.
- The support of file formats is not that wide.
- Many ads on the page.
- Internet-dependent
- With a limited 35MB file size for its reversing feature.
2. Reverse Clip with Clideo
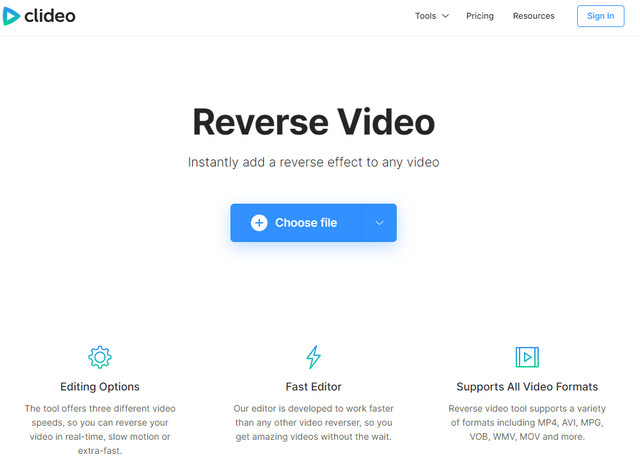
Clideo is an online tool that reverses a video clip that offers three different video speeds. This video editor guarantees high-security protection on the files of the users. In addition, it claims to support all kinds of video formats, with its acceleration technology that edits the videos instantly. So without any further adieu, let us see the amazing work of Clideo with the steps provided below.
Step 1Open your browser and visit the website. Explore all the features by clicking the All-Tools tab located at the bottom-most center part.
Step 2Among the features, choose the Reverse Video feature. Upload the video file by tapping on the Choose File button, then wait for the uploading process to finish.
Step 3Choose your preferred speed among 0.5x, 1x, and 2x. Options of final output, format and mute video are also available to modify. When all are set, click the Export button. Standby while the process is ongoing, then download the file.
- It's web-based, no need to download software.
- Versatile and comprehensive with editing tools.
- Internet-dependent.
- Contains a watermark on the output.
- The process of downloading the output takes time.
Part 4. How to Reverse a Video on Android
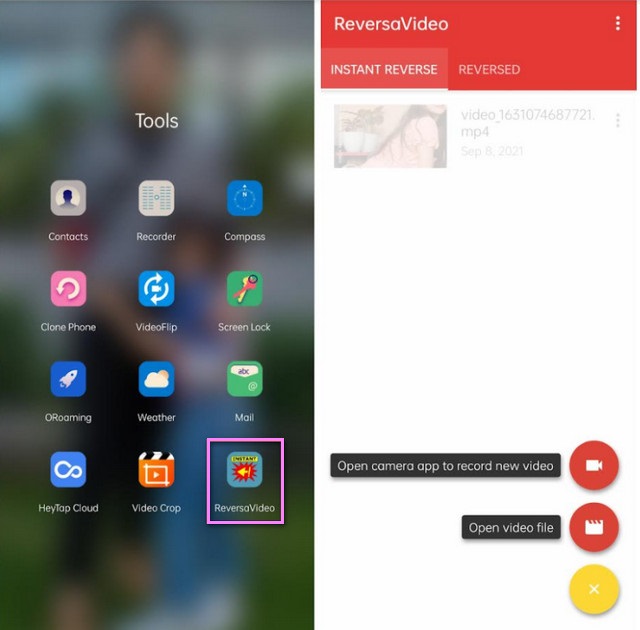
Reversing video on mobile devices such as Android, makes people often do. Therefore, we introduce the most ideal video reverser for Android that you can use anytime. The Reversa Video is a mobile app that works great with playing a video backward as it means by its name. Moving forward, using it won't be a hassle at all. By simply installing it on your device, and uploading the file, the video will automatically be played in reverse.
- It is handy and can be used anytime anywhere with your phone.
- The interface and process are so smooth to navigate.
- Sometimes the videos disappear when playing back.
- Seems like the quality of the video becomes poor after reversing.
Part 5. FAQs About the Video Reverser Tools
Can I reverse the video on the finder of Mac?
The Mac's Finder unfortunately cannot do the task.
Does QuickTime have a reverse setting?
QuickTime has the rotating and flipping settings. However, it doesn't allow the user to reverse a video file.
Does video reversing lose the quality of the video?
Technically speaking, some of the tools that offer video reverse affect the quality of the video. However, the AVAide Video Converter guaranteed no quality loss for such a task.
Playing a reversed clip may be unusual to others but leave awe to many. As we live in an innovative technology world, we should be on-trend. To wrap this article up, the featured tools will definitely help you with your video editing job. Explore more on what they could offer by trying them all, most especially the AVAide Video Converter.
Your complete video toolbox that supports 350+ formats for conversion in lossless quality.


