Converting GIF to MP4 is one of the best choices you can make. An MP4 file is lighter, which means it will not take up as much space compared to a GIF. At the same time, it gives you better quality, richer colors, and even sound if you want to add it. MP4 is also the most accepted format for sharing on social media, websites, and apps. So, without further discussion, please check out the best solutions below!
Part 1: GIF vs MP4
GIF and MP4 may both play moving pictures, but they are not made the same way. Each has things it does well and things it does not. Learning the difference makes it easier to know which one to use.
1. File Size
GIFs are much larger because they store every frame like a picture. MP4 uses compression, so it takes up less space. That is the main reason why MP4 loads faster online.
2. Quality
GIFs often look grainy or pixelated, especially with many colors. MP4 keeps better detail and smoother motion, even at high resolution.
3. Audio
GIFs are silent as they cannot store sound. MP4 supports audio, which makes it better for clips that need voices or music.
4. Compatibility
GIFs work almost anywhere, from messaging apps to browsers, without extra support. MP4 also works on most devices, but some apps may compress or limit playback.
5. Usage
GIFs are mainly used for memes, reactions, or short loops because they are simple. MP4 is used for movies, vlogs, tutorials, and anything that needs both quality and sound.
Part 2: AVAide Video Converter (For Absolute Beginners)
AVAide Video Converter makes it easy to turn your GIF into MP4, while keeping the same bright colors and smooth motion. This converter gives you control over how the final video looks. You can pick the resolution, fine-tune the frame rate, encoder, etc.
There are also built-in editing features that let you crop, rotate, add filters, or even put a watermark. The best part is the speed. With its advanced acceleration technology, the converter works up to 30× faster, saving you time when converting many GIFs.
Step 1Go to the AVAide Video Converter official website and download the program. Follow the on-screen guide until the installation is complete. Once done, open the converter so we can start.

FREE DOWNLOAD For Windows 7 or later
 Secure Download
FREE DOWNLOAD For Mac OS X 10.13 or later
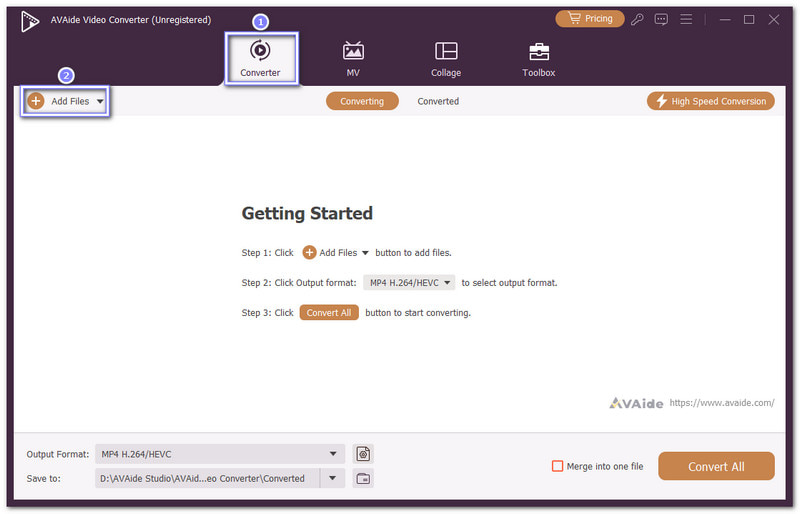
Secure DownloadStep 2You are automatically on the Converter tab. Now, import your GIF by clicking the Add Files button on the upper left.
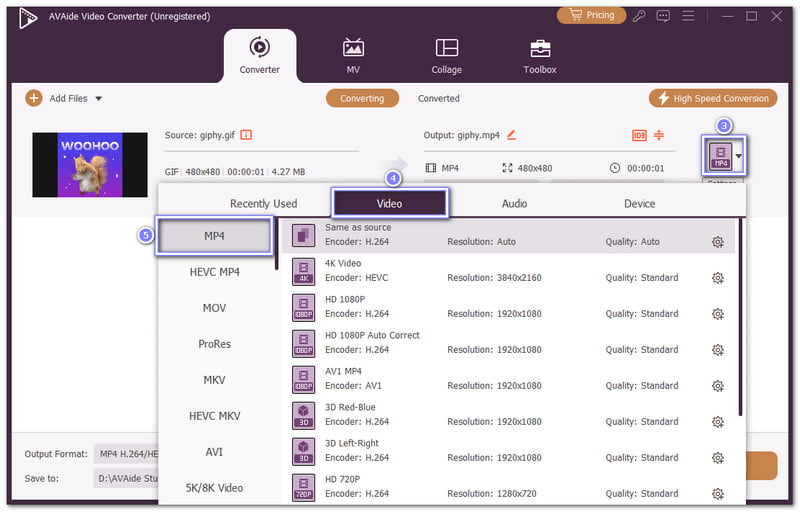
Step 3Next, go to the Profile drop-down menu. It is where you will see many formats. Under the Video section, click MP4 as your output. It makes sure your GIF will be saved in MP4 format.
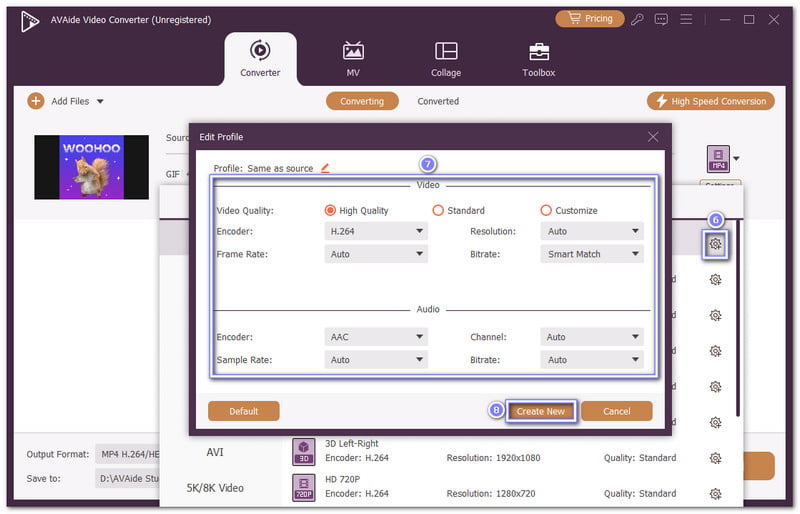
Step 4Want to adjust the settings? Click the Cogwheel button. Here you can change the resolution, bitrate, encoder, and frame rate under Video. If you want, you can also tweak the Audio by setting the channel, bitrate, encoder, or sample rate. When you are happy with the setup, press Create New to save the custom profile.
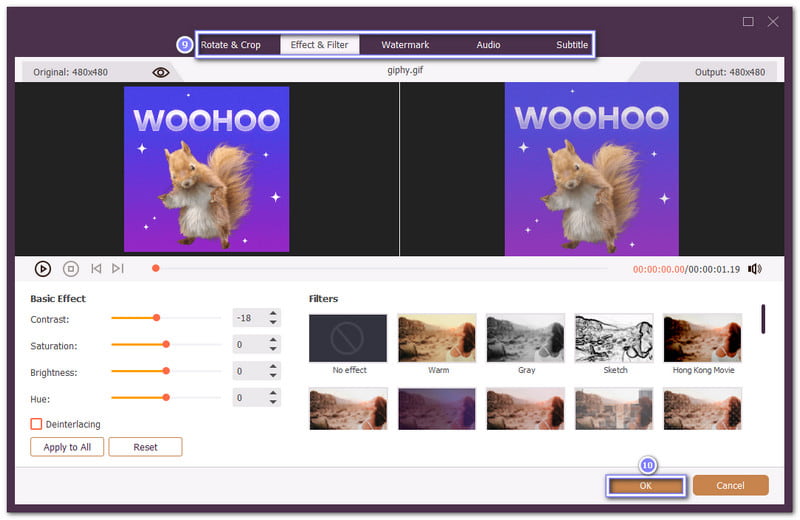
Step 5Let us make the video look better. Hit the Wand button to open the editing panel. You can rotate, crop, fix lightning, and apply filters. If you want to show ownership, embed a text or image watermark. You can even add an audio, adjust the volume, and delay. Do not forget to click OK after every change to apply it.
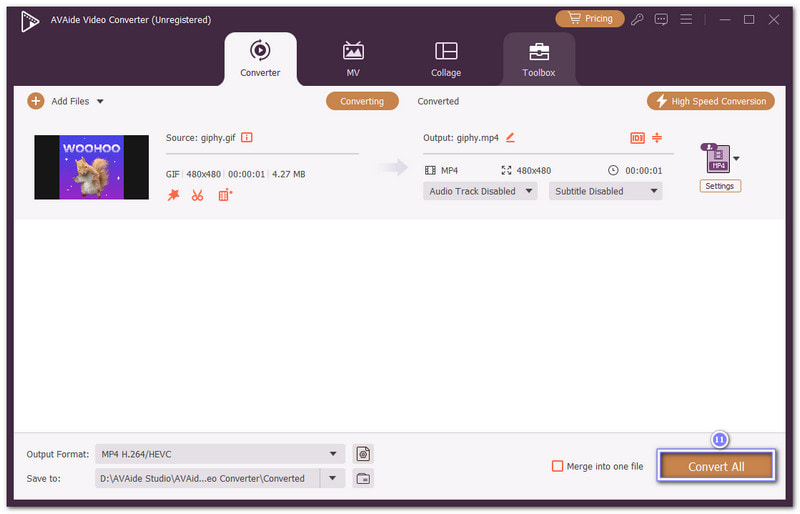
Step 6Finally, when everything is ready, press the Convert All button. The program will start changing your GIF into MP4. Please wait for it to finish, then check your local folder. Your converted MP4 will be there, ready to watch or share.
Benefits and drawbacks of AVAide Video Converter: AVAide Video Converter supports almost all popular formats, so you can convert GIFs to MOV, MP4, AVI, and more. The converter has a simple layout, which makes it friendly even for beginners. However, you need to purchase to enjoy the full features without any limitations.
Part 3: Kapwing (For Social Media Creators)
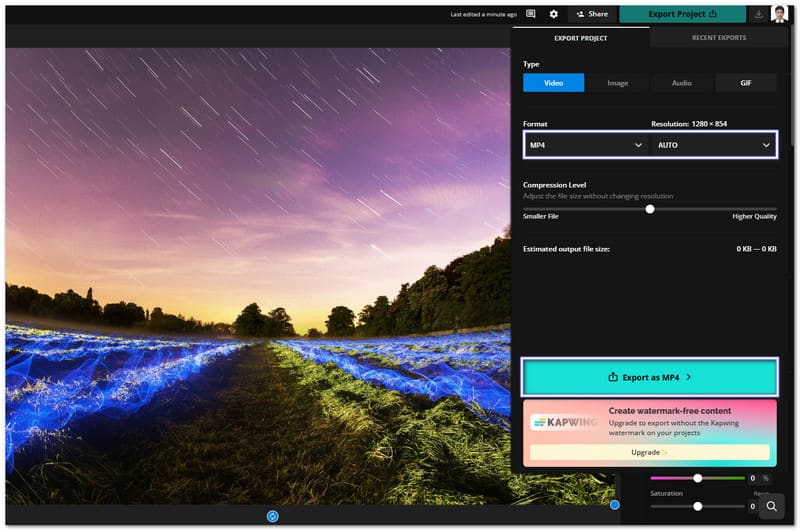
Kapwing is an online editor that enables you to convert GIFs to MP4 online with ease. You can drop your GIF file, paste a link, or even start with a template. The platform supports multiple platforms with presets, like TikTok (1080×1920), Instagram (1080×1350), or Twitter/X (1280×720), making it flexible. You can also incorporate filters, adjust colors, or crop the video before saving it.
Step 1Open your web browser and search for Kapwing - GIF to MP4 Converter.
Step 2Click the Upload GIF, and then Click to Upload to import your GIF.
Step 3Once your GIF is loaded, you can do some editing first. You can crop, rotate, fine-tune color, lighting, apply animation, or apply a filter.
Step 4Once satisfied, click the Export button, and as you can see, MP4 is already set as the Format. You can also change the Resolution to 480p, 720p, 1080p, or 4K before diving into conversion.
Step 5Finally, click the Export as MP4 button, and please wait for you to get your video file.
Benefits and drawbacks of Kapwing: It supports collaboration, so teams can work on the same project in real time. You can also use it to convert GIF to WebM or MOV. Additionally, you can change the resolution to 480p, 720p, 1080p, or 4K. However, you need an account to export without watermarks.
Part 4: FFmpeg (For Tech Professionals)
For those who enjoy control, FFmpeg is the best option to turn GIFs into MP4. It is not a drag-and-drop editor but a command-line platform. It makes it powerful and flexible, as you can change formats, crop video, or compress files using typed commands. It works across Windows, Mac, and Linux, and it is completely free. While the setup feels technical, many users trust FFmpeg because it gives precise results that regular converters cannot always achieve.
Check the steps below to learn how FFmpeg GIF to MP4 works!
Step 1First, install FFmpeg on your computer; you need it ready before starting.
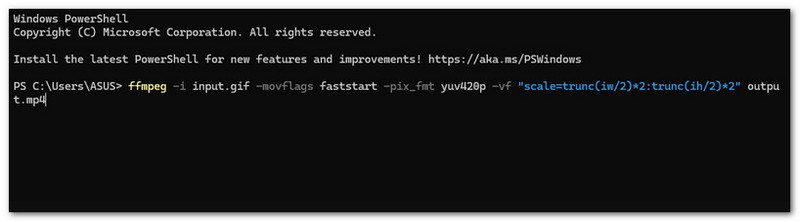
Step 2Next, open your CMD (Command Prompt). Then, type the command:
ffmpeg -i input.gif -movflags faststart -pix_fmt yuv420p output.mp4
• -i input.gif means this is the GIF you want to change.
• -movflags faststart moves the metadata to the start, so it streams faster.
• -pix_fmt yuv420p makes sure the MP4 will work on most players.
• output.mp4 is the new file name.
Step 3Press Enter, and please wait. Soon, your GIF becomes an MP4 file.
Benefits and drawbacks of FFmpeg: It can automate tasks, letting you batch-convert many GIFs to MP4 at once. On the downside, the program has no graphical interface, which makes it unfriendly for beginners. The learning curve is high, and typing the wrong command can cause errors or low-quality results.
Part 5: Photoshop (For Design Teams)
Most people know that this platform is only for editing images, but it also works with animation. You are allowed to export GIF to MP4 using Adobe Photoshop. That means you can load a GIF into the program and export it as MP4. The process is done through the render video feature, which gives you options like resolution, clarity, and frame rate.
What makes Photoshop helpful is the creative control. You can adjust color, add effects, and fine-tune details before saving the final video. No doubt, it is super popular among design teams and creators.
Step 1Open Photoshop on your computer.
Step 2Go to the File tab, press Open, and choose the GIF you want to convert.
Step 3Go back to File, pick Export, and click Render Video. A box will pop up; type a name for your video and pick where you want to save it.
Step 4In the menu, click Photoshop Image Sequence. From the options, select MP4 as the output. You can also fine-tune the video size, quality, frame rate, and more if you want, but it is only optional.
Step 5For the last step, press OK, and Photoshop will transform your GIF into MP4.

Benefits and drawbacks of Photoshop: It is reliable for managing large or complex GIF files. The program allows precise control of frame timing, blending, and even layers before exporting. But the drawback is that Photoshop is not free, and the subscription can be expensive. It is also heavier on system resources, which can slow down older computers.
Part 6: Shortcuts (For iPhone Users)
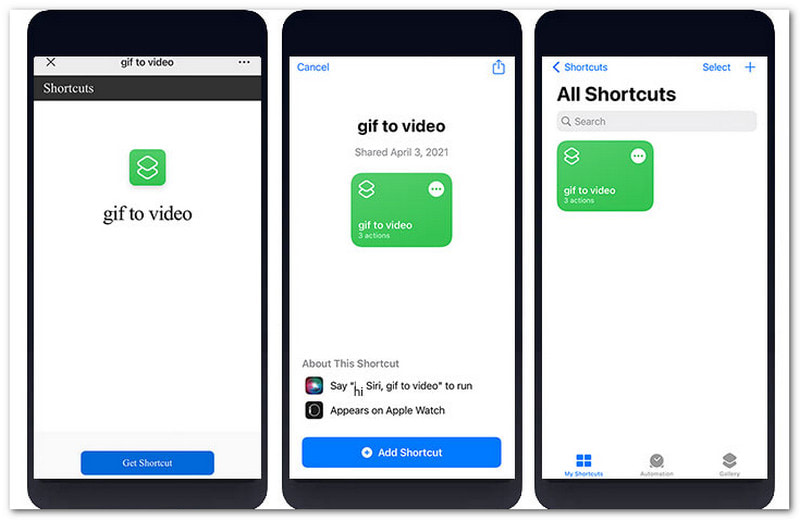
On iPhone, Shortcuts can transfer GIFs to MP4 without using third-party tools. It works by creating an automated flow that turns your GIF into a video. You can add a custom shortcut, copy the GIF from your photos, and run the command. Within seconds, the MP4 version is saved in your gallery, ready to use on messaging or social media.
Step 1Install Shortcuts on your iPhone if you do not have it yet.
Step 2On the new page, hit Get Shortcut. It will open in the Shortcuts app.
Step 3Tap Add Shortcut. Now, go to your Photos app and choose the GIF you want. Next, press the Share button, and then Copy Photo.
Step 4Open Shortcuts and run the GIF to Video shortcut you just added. Tap Allow Once or Allow Always when asked.
Step 5Go back to your Photos app; you will now see the MP4 video saved from the GIF.
Benefits and drawbacks of Shortcut on iPhone: The process is quick and safe since it uses a native app. It also works offline once set up. The drawback is that creating and running shortcuts can feel confusing for first-time users. Also, the output quality and options are basic compared to professional editors.
Part 7: Screen Record + Trim (Android Alternative)
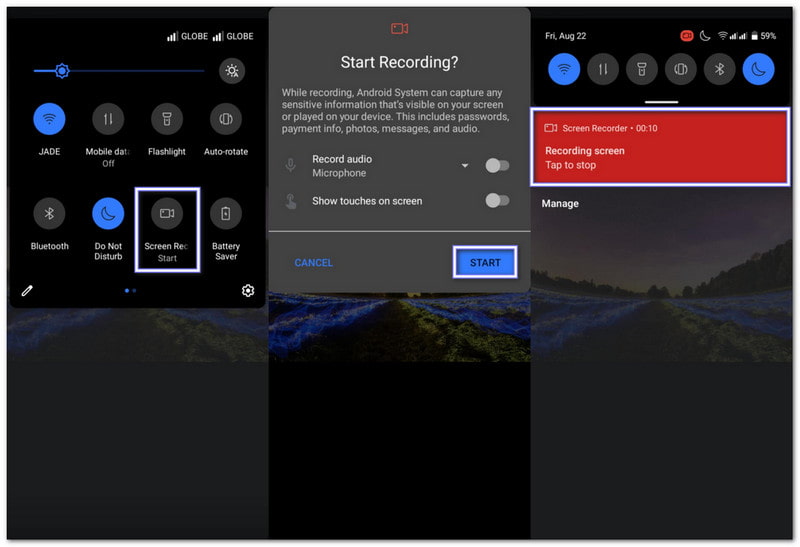
Android users can rely on the built-in screen record tool to export GIFs to MP4. You just open the GIF, hit record, and play it in full screen. Once saved, trim the start and end to remove blank parts. It is the fastest option if you do not want to download apps or connect to the internet. The video is saved straight to your gallery as an MP4, making it easy to share on chat apps, social media, or cloud storage.
Step 1Open the GIF on your phone and make it full screen. You can use your gallery, file manager, or any app that plays GIFs.
Step 2Swipe down your screen and tap Screen Record. If you do not see it, add it from your quick settings.
Step 3Press Record and let the GIF play. Please do not touch or move your phone until it ends. Once it is done, stop the recording. Your phone saves it as an MP4 file.
Step 4Open the new video in your Gallery. Tap Edit or Trim. Cut off the extra parts at the start and end.
Step 5Save the trimmed video. Now, you have your GIF in MP4 format, ready to use or share.
Benefits and drawbacks of Screen Record + Trim on Android: It is free and requires no extra installation, so anyone can use it. The method works on almost all newer Android phones, and the final video is ready instantly. However, the quality depends on screen resolution, and you cannot keep the original frame rate. Recording also captures any screen notifications or movement, so you need to be careful while doing it.
With our GIF to MP4 converters, it will be easy for you now to change your files into a universal format. The good thing is that these tools work on different systems. AVAide Video Converter, for example, is compatible with both Windows and Mac. You can use it not only to convert but also to edit your videos. Simple, fast, and effective. Now, you can turn any GIF into an MP4 whenever you need.
ABOUT THE AUTHOR

Your complete video toolbox that supports 350+ formats for conversion in lossless quality.