Do you have a ton of music stored in your iTunes library? Then you might want to copy it to your computer for backup, to enjoy, or because it's not working on other programs. You can go to your iTunes music and download them to your computer or iPhone. It is like giving your computer its own personal soundtrack, with all your favorite songs to listen to whenever you want. Hence, do not worry if you do not know how to do it because this article will show you how to easily transfer music from iTunes to your computer. By following the steps below, you will be a music copying pro in no time!
Part 1. How Do You Download Music from iTunes to Your Computer
There are two other ways to download music from iTunes to a computer. One way is to use the iTunes program to get your songs off iTunes and onto your computer. However, this method means finding each song and copying it one by one, which can take a long time. On top of that, you might run into problems with iTunes itself or limitations like some songs being protected by Apple since you bought them there. The other way is to use a third-party music converter, which will help you convert all your songs to a different audio format, such as MP3. This way can even be more of a hassle for you since you will still need to identify what music downloader can accommodate or acquire all of the iTunes music you have from your library. That said, let's just stick to the original way of using the iTunes program itself.
Download to Mac Computer
Step 1Go to your Finder to search and open your iTunes app.
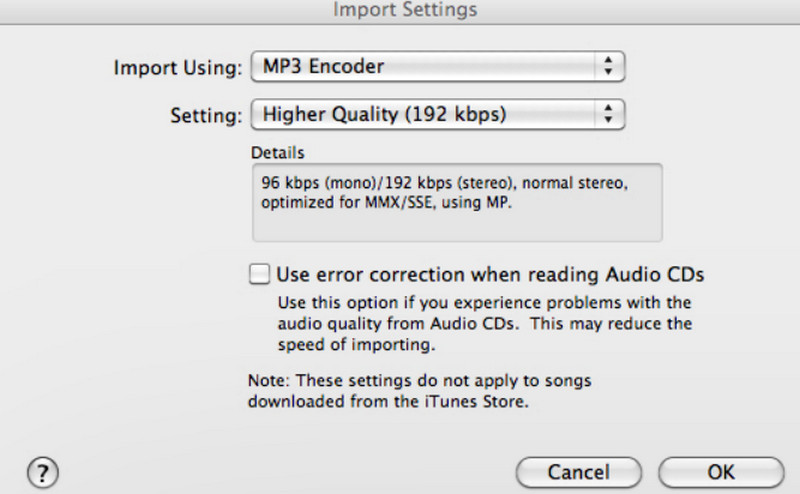
Step 2Once the app is launched, navigate to the Preferences and choose the General tab menu. From there, click Import Settings, select the MP3 Encoder option, and click OK.
Step 3Highlight the songs you want to download. Then, click the File option and click Convert.
Step 4You can now click the Create New Version button. Once done, export the MP3 files to your Mac.
Download to Windows Computer
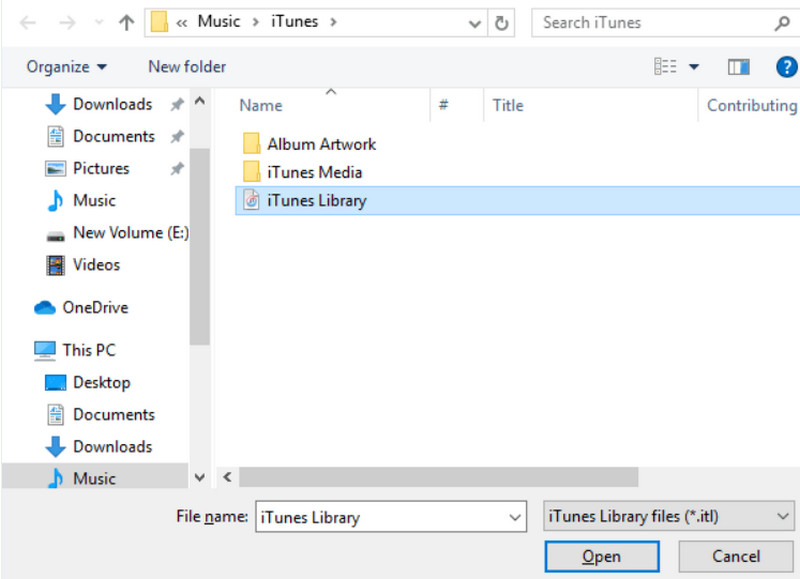
Step 1On your desktop, navigate to User and go to your Username. Then, go to My Music and choose iTunes.
Step 2As you see the iTunes folder, move it to your desktop computer. This is the way how to download music from iTunes to a computer.
Step 3Now, if you want to export the iTunes music to another computer, you can utilize an external storage disk or drive. Copy the folder or songs one by one, then paste them to the external drive. Then, plug the drive into the computer and export the songs there.
Part 2. How to Download iTunes Music to iPhone
If you wish to transfer iTunes music to your iPhone, the latest or newest version of the app is crucial. You must also have your USB cable, which you will use to connect the iPhone to your computer. When all is good, start following the given guidelines below.
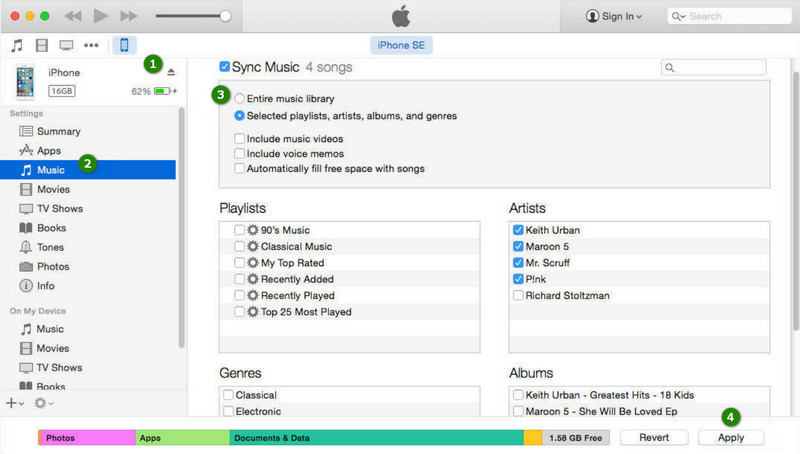
Step 1Connect your iPhone to the PC where your iTunes music collections are using your USB cable. Once connected, open the iTunes app.
Step 2 Look for the iPhone icon in the upper left part of the iTunes interface. Then, expand the option by clicking the button beside the iPhone icon. Once the options are expanded, select the Music option.
Step 3After that, click the Sync option that you desire. Then, click the Sync or Apply button to begin the music transfer.
Step 4Properly eject your connected iPhone from your computer to ensure the safety of your data.
Part 3. PC Isn't Authorized: Best Alternative to Download iTunes Music
Due to Apple's DRM protection, you may get iTunes limitations or sometimes errors when downloading and transferring music. If iTunes prohibits you from transferring your favorite song to your device, then we have the best alternative for you to perform. Try to record the music and get the best recording you have ever had before. For this, we highly recommend you use the AVAide Screen Recorder.
AVAide Screen Recorder
Even though its name suggests that the AVAide Screen Recorder is not just for capturing what is on your computer screen, it is also an excellent tool for recording audio. So, whether you are a musician creating new tracks, taking voice notes for yourself, or just want to create copies of your favorite songs, this program lets you record high-quality audio. Furthermore, this AVAide Screen Recorder lets you record sounds from your computer's system through a microphone, such as the music you are playing and your voice. It is fantastic since it even has features to improve the microphone audio by reducing background noise and making your voice clearer. Therefore, follow the simple steps below to show you how to record your iTunes music with this recording tool.
Step 1The first step is to download and install the AVAide Screen Recorder on your computer. The Download buttons below will help you expedite this step.

TRY IT FREE For Windows 7 or later
 Secure Download
TRY IT FREE For Mac OS X 10.13 or later
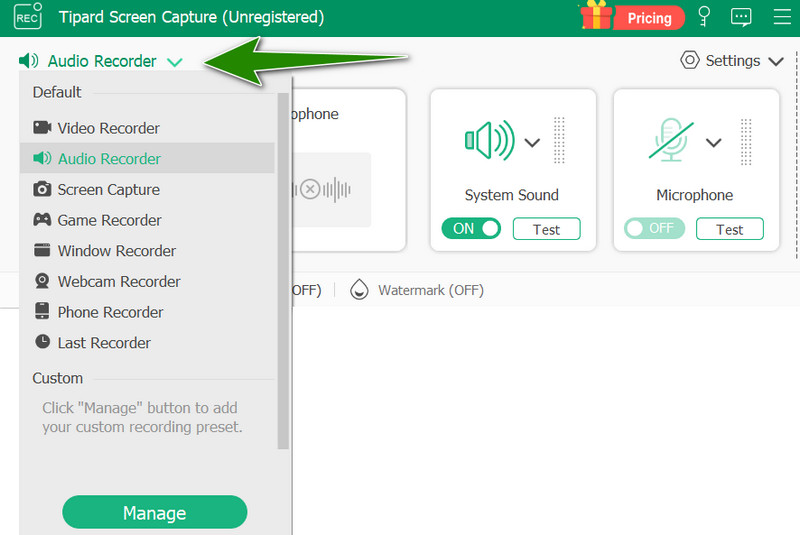
Secure DownloadStep 2Launch the program once it is installed. Then, go to the Audio Recorder tool by clicking the drop-down arrow at the left upper part of the interface.
Step 3Set the parameters of the presets of the tool accordingly. Then, begin playing the iTunes music one by one or continuously if you want to create a playlist recording.
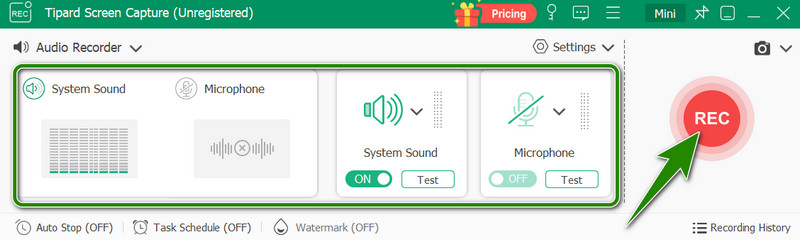
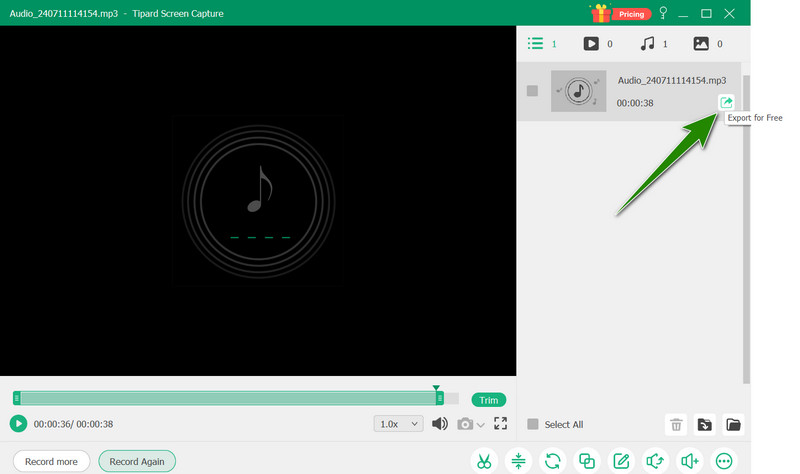
Step 4Then, click the REC button synchronically when you play the first music you want to record from iTunes. To finish the recording, click the stop button. Then, feel free to customize your recording from the next window and click the Export button once done.
The guidelines above will help you transfer downloaded music from iTunes onto your computer and iPhone. Ensure you have the necessary requirements, such as an updated iTunes app and a USB cable, and then you are ready. However, keep in mind the limitations that you can encounter with iTunes. In that case, learn the best alternative to get your music collection with the help of AVAide Screen Recorder.
Record screen, audio, webcam, gameplay, online meetings, as well as iPhone/Android screen on your computer.